Basic photography 101 - A Users Guide to Understanding All Those #@$! Numbers and Terms!


So you got a new digital or 35mm camera. Congratulations! Now all that's left before you go out to take some outstanding pictures is to try and figure out what all those numbers on your camera mean. The instruction book that came with your camera is good but what the heck is "F/stop"?? or "depth of field"??
This EDU will guide you through all the confusion and help you to get started in photography. In addition, you'll learn proper metering techniques and see examples of how and when to use the flash on, or off, of your camera.
There are many markings and numbers on your camera and lens. Most noobs are easily confused by then. Here is a guide to what they mean. How and why you use these markings is discussed after the introduction. Please note that digital cameras may not have these markings but all 35mm SLR’s will have them.
LEARNING YOUR WAY AROUND YOUR CAMERA
The infinity symbol (sideways figure 8) is found on the lens and it refers to the maximum focus point (distance) of your lens. There are usually other numbers on the lens that are the focus distance in meters or feet. These numbers can be useful especially when figuring depth of field, which will be discussed later.
The other markings on your lens are the ones that confuse people the most. These are the aperture settings or F/stops. They look like this:
1.2 2.8 4 5.6 8 11 16 22.
The F/stop markings on your lens may be slightly different but they all do the same thing and that is control how much light passes thru your lens to the film or pixals. Each setting is double the amount of light. For example, f/4 allows twice as much light as f/5.6 even though the numerical values don’t add up to double. Confusing? Yes. F/stops work in conjunction with shutter speeds to control how much light hits the film or pixals to make a proper exposure.
F/stops also play a role in controlling depth of field. Depth of field refers to how much of your subject is in focus from near to far. The smaller the aperture (f/16 is smaller than f/8 for example) the more the DOF in your picture.
Where you focus the camera also plays a role in DOF. The closer your subject is to the camera, the less DOF you’ll have. This is why macro shots have very shallow DOF.
Lens selection is also crucial in determing how much depth of field you'll have in a given picture. The longer the lens (telephoto) the less DOF you’ll have. Conversely, the wider the lens, the more DOF in your picture.
Your camera also has a shutter speed knob or dial. Most cameras double the shutter speed as you move up or down the scale. For instance, my camera's settings in seconds are:1 -/1/2-/1/4 -/1/8/-1/15/-1/30/-1/60/-1/125-1/250-1/500-1/1000. Most professional photographers can hand hold a camera at 1/30 sec with a wide angle lens and get a sharp picture but going any slower or using a longer lens requires a tripod or some other sort of camera support.
Most of the newer DLR cameras have the shutter speed/ aperture settings displayed on a menu or in the viewfinder and not on the lens or camera body. These "electronic" settings may vary from what I've listed but they do the same job, i.e. control how much light enters the lens to make the proper exposure.
The "B" next to your shutter speed knob stands for "Bulb". It's typically used in conjunction with a cable release to hold the shutter open for long exposures.
An "X" by the 60 or 125 shutter speed means that's the shutter speed at which your flash will sync with your camera. If you use a faster shutter speed the shutter itself will close before the flash has fully fired leaving part of your picture dark. You can always sync a flash at a slower speed. Some cameras like the Hassleblad use a different type shutter and will flash sync at any speed. Also, many of the newer DSLR cameras will flash sync at higher shutter speeds.
EXPOSURE
Your camera has to have the right combination of light + exposure time to = proper exposure. Your shutter speed and your lens aperture work together to give you the correct exposure as determined by either you or your camera. (more on how to determine best exposure later). This means that if you change shutter speed you must also change f/stop (aperture) in order to keep the same exposure value.
Lets assume that your camera's light meter tells you that 1/60 second exposure time @ f/11 will give you the correct exposure. If you were to place the shutter speeds and the f/stops (aperture) on a scale the following combinations would also give you exactly the same exposure value.
1/15 - 1/30 - 1/60 - 1/125 - 1/250 - 1/500 - 1/1000 f/22 - f/16 -- f/11 - - f/8 --- f/5.6 -- - f/4 - -- f/2.8
Deciding which combination to use depends primarily on which is more important to the photographer, shutter speed or depth of field for this particular picture. Remember however, if you change shutter speed setting (or aperture) you must change the corresponding aperture (or shutter speed) setting to keep the same exposure value.
For example. If your camera light meter tells you that 1/60 second at f/11 will give you the correct exposure and you want to increase your shutter speed to 1/250 sec you must open your lens aperture to f/5.6 in order to keep the same exposure value. You have to let in more light to compensate for the fact that you're now cutting the amount of time that the light will be exposed on the film or pixals.
Remember, f/5.6 is two stops wider than f/11 and 1/250 sec is two shutter speed settings from 1/60. This is the easiest way to remember this as opposed to thinking; "hmm...1/250 is four times faster than 1/60 so I need four times as much light...." The math is much easier if you simply remember if you change your shutter speed by x number of clicks you must change the aperature the same number. And vice versa obviously.
Faster shutter speeds means you need more light. Less light means you need slower shutter speeds.
WHAT IS ISO?
ISO refers to a films "speed" or the sensativity of the pixals you've selected in your digital camera. The higher the number, the more sensative to light is the film/pixals. However, the higher the speed the more "grain" or "noise" you'll get in your final picture. High speed film or ISO settings is useful for shooting fast action where you need a very short shutter speed to "freeze" the action. It's also useful in very low light situations. The rule of thumb is to use the slowest film/ ISO setting you can for the shot you want.
HOW TO GET THE PROPER EXPOSURE
Much can be written about this however I'll try to keep it simple. There are two types of light meters that are used to measure the amount of light your camera needs. Incident and Reflective. Incident meters measure the amount of light that is illuminating a subject. These meters are used mainly by professional cinematographers and photogaphers. Reflective meters measure the amount of light that is reflecting off your subject. A Reflective meter is what your cameras uses to judge how much light is needed to make a proper exposure. The easist way to use your meter is this:
Let your camera do the work for you.
The vast majority of pictures will turn out just fine if you trust your camera's built in exposure meter. Your camera "sees" the image and calulates the exposure value based on the areas of light and dark in the scene. Most cameras will average the light and dark parts of a scene to come up with the correct setting however some cameras will allow you to "spot" the area you want to meter.
Your camera will then either set the f/stop (remember those?) or the shutter speed or both automatically for you. Some cameras allow you to chose either the shutter speed or the f/stop you want to use and the camera will do the rest.
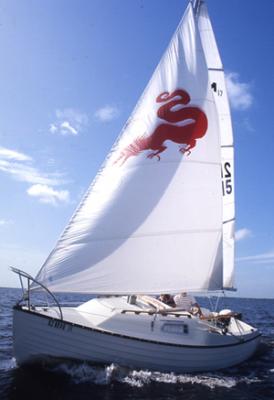
The problem with this type of photography is that your camera is only as smart as you allow it. For instance, if you want to take a picture of a very bright subject, say a sailboat with white sails, the camera will "see" all this white area and try to average it so that it comes out to be a middle grey. This will cause the picture to be "underexposed" or in other words, not enough light has passed thru the lens to make a proper exposure. In order to make a correct exposure of the follwing picture I had to open my aperture one full f/stop to allow more light to hit the film.
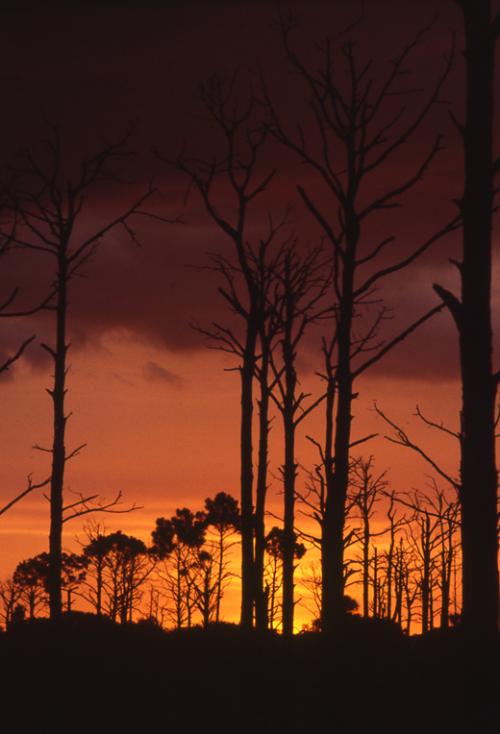
Conversely, the opposite is true when taking pictures of a scene with a lot of dark areas. Your camera will "see" all the black or dark areas and try to make them grey. This leads to "overexposure". In order to take the following picture I had to "stop down" my aperture by one or more stops.
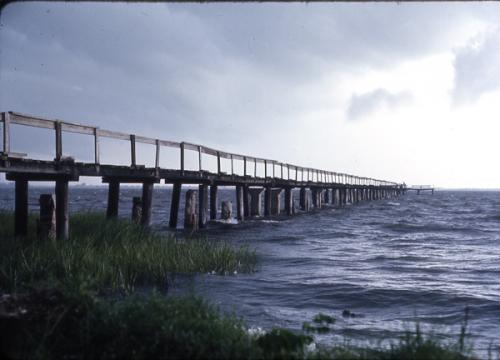
This picture was just right. The camera saw all the light and dark in the scene and gave me the correct exposure.
All professional photographers use a little trick to insure that they get a correct exposure on shots like the ones above. They will "bracket" the exposure by shooting multiple shots of the same scene. This means that they shoot one f/stop "over" exposed, one "normal" exposure (what they think is the correct exposure) and one "under" exposed shot. Many pros will shoot in half stop increments and go two or three stops over and under to insure that they have the absolute correct exposure.
The advent of digital photography and photoshop have done a lot to eliminate this practice since it's easy to see what you've got or to "fix it" in post if necessary. However, the professional photographer gets the right exposure for any picture 90% of the time. Your percentage may vary.
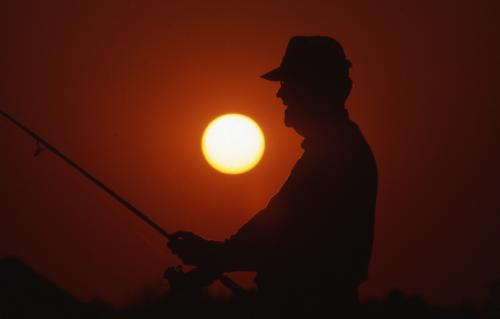
Finally, there are certain shots that defy logic in trying to get a correct exposure. This shot of a fisherman at sunset is one. When you take a picture like this with the sun in the picture, the sun is so bright that it makes metering difficult. The trick is to move your camera so the sun is just outside of the frame, note the meter reading that your camera gives you, lock the meter (or set the shutter speed and aperture combination) into place the reframe your shot and shoot.
DEPTH OF FIELD
When you take a picture you focus on your subject. However, depending on aperature setting and how close to the subject you are will determine how much of your subject stays in focus. Also, the smaller the aperature you use (higher f/stop number) the more DoF you will have.
Depth of Field (DoF) is the distance in front of and behind your focus point that will appear to be in sharp focus.
Image size and f-stop are the main determinants of depth of field. Focal length of the lens does not matter, although on the extreme ends of focal length, image diffraction and interference play some part. If one moves an 18mm shot close enough to make the subject exactly the same size as it was with the 250mm lens, then the DoF is identical assuming the f-stop is exactly the same.
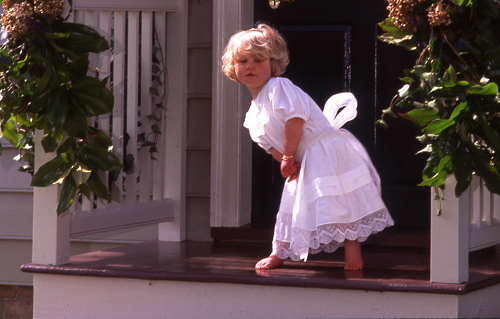
The following pictures are examples of DoF and how best to use it. The first two pictures were taken with the same lens (135mm) but the image size is different. In the first pic of the little boy, the subject is about 10' from my camera. The background is out of focus due to two things. First, the closer the subject is to the camera, the less DoF you will have. Second, by using an aperature of about f/5.6 I was able to insure that the background would be nice and soft. Note. I should have used a flash on my camera to "fill in" the boys face with light. I was still a noob when I took this picture and didn't have a good flash yet.

In the second picture, the same lens was used but I was farther away from the subject. I also used a smaller aperature (around f/11) to insure sharpness. Combined, this makes the whole picture sharp.
In the last picture, The subject is actually quite close to the camera. I used a 50mm lens and a very small DoF (f/16) to insure that the subject would be sharp. The use of the small aperature means that I needed a lot of light and a somewhat slow (1/30 sec) shutter speed. I obviously used a tripod with this slow of a shutter speed.
A good rule of thumb is to always focus on your subjects eyes when shooting close up shots of people.
Most cameras are equipped with a mechanism that directs all of the light from the lens to the viewfinder at your widest aperture until you actually take the picture. This allows you to easily compose the picture as the image in the viewfinder is bright and clear. However this can fool you into thinking you have less DoF than you actually do. However most cameras also have a DoF preview button that you can press and the lens will "stop down" to the f/stop you've selected. By simply viewing the scene thru the viewfinder you can actually see the sharpness increase and you can see your DoF. Of course the picture will become darker since less light is directed to the viewfinder.
Many cameras have a ring of f/stop values located next to the distance markings on the lens. These f/stops are another guide to help you determine DoF at a particular f/stop setting without having to "stop down" the lens and view the picture.
FLASH PHOTGRAPHY
Most people think of flash photography as simply turning on the flash that is built in to their cameras and snapping away. While this is fine for taking snap shots of your buddies while they’re downing shots at your local bar, more often than not the pictures turn out looking quite amateurish.
This is not to say that you shouldn’t use the flash that is built into your camera or a separate flash that attaches to your camera, but how and when you use it makes all the difference between a snap shot and a photograph.
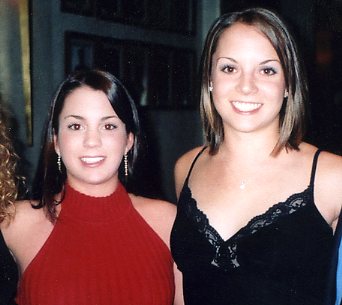
The "snapshot look" generally comes from the fact that placing a powerful light so close to the lens results in a washed out picture where the foreground is exposed properly (or often overexposed) but the background is severely underexposed. As you remember, underexposure is the lack of light on the scene and overexposure is too much light for the scene. Speaking of power, while your flash is powerful enough to light a scene from 10’ feet away, that’s about all it will do. Don’t expect your flash to be able to completely light an entire room much less an auditorium. Light falls off at a tremendous rate so you need an extremely powerful flash to be able to light large areas. This is an example of the "snapshot" look from an oncamera flash. The girls are exposed properly but notice how the background is quite dark.
HOW TO SET EXPOSURE FOR FLASH
All aftermarket flash units have a scale built in that will tell you at what range they are effective. Some even offer an automatic setting that regulates how much light it puts out depending on how close you are to the subject. The effective range of the flash is dependent on the speed of the film or ISO setting on your digital camera.
In order to get a proper exposure using an aftermarket flash, you first have to dial in your film or ISO speed. If the flash is in manual mode, you would then calculate the distance from the flash to the subject. The scale on the back of the flash would then give you the right aperture (f/stop) to use. Some flash units offer an automatic setting whereby you set the aperture you want to use and the flash will adjust itself to give you the correct exposure from 5’ to 25’. The flash actually "sees" the light as it bounces off your subject and automatically shuts itself off when enough light has reached the subject.
FILL FLASH
You might think that using flash in daylight isn’t necessary but it can add a lot to your pictures. This technique is called "fill flash". It’s used to help fill in the dark shadows caused by the bright sun. It’s normally used for taking pictures of people rather than larger objects. The only trick is that you have to use a shutter speed (usually 1/60) that will sync with your flash. Note: newer digital cameras will usually sync at any shutter speed which makes fill flash much easier to do. Point and shoot cameras can simply leave the flash on all the time. When you use a slower shutter speed in the bright sun, your aperture setting may be too small (f/22 for example) for your flash to be effective. In this case, switching to a very slow film or ISO setting will help or if your camera will sync with the flash at any shutter speed, simply use a faster shutter speed and a larger aperature setting (f/8 for example instead of f/22) Bear in mind that fill flash typically works best when the subject is fairly close to the camera. Below is an example of fill flash in broad daylight.
TAKE THE FLASH OFF YOUR CAMERA
People and most other objects typically look better when the light is coming from the side or above the lens. If you’ve ever watched a wedding photographer at work you’ll see that he or she will often hold the flash above the camera.
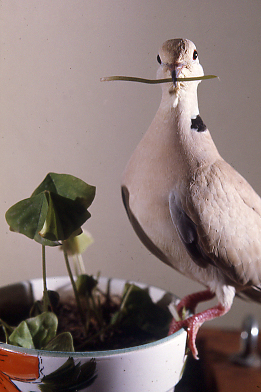
If one flash is good, two are better. Flash units are not expensive. I have three, one primary and two "slaves". I think I spent about $30-$40 for each slave unit. The slaves are used for sidelight, backlight and set lights when necessary. They are fired by a remote sensor that "sees" the light from my main flash which then triggers the slaves to fire. These lights help to add depth to a shot. In the example below, two flash units were used, one on each side of the bird. You can see how the light illuminates the bird evenly. Also, round objects, like this bird, usually look best when lit from the side.
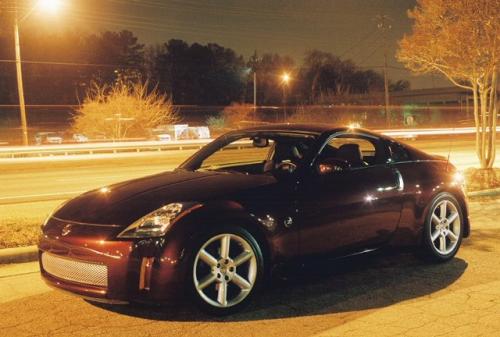
Here is another shot where I used a single flash to light up my car. I set my camera to a long 30-40 second exposure and then walked around, firing the flash at the car from about 10’ away. I had the aperture set at f/22 so that I could take a long exposure but f/22 was too small a setting to really light the car in full. However you can see how the flash helps to light the tires and rims.
Flash photography also usually looks best when the flash is bounced off a white card or wall. While this cuts down on the range of the flash it softens the light so you don’t get harsh shadows. In the following pic I use a "bounce" card mounted above my flash that directs the light towards my subject when I have to use a flash mounted on the camera. I still prefer to take the light off the camera but sometimes that isn’t practical. Professionals will often bounce a flash into a white or silver umbrella to soften the light. Remember that if you bounce the light off a wall or ceiling, the light will pick up the color of the wall. This is why it’s important to use white or silver as a reflector.

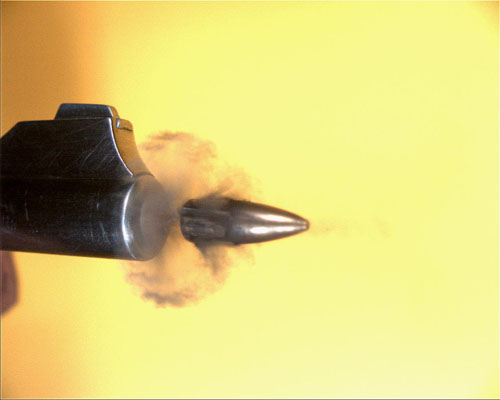
FASTER THAN A SPEEDING BULLET
Perhaps the best use of flash is its ability to freeze fast moving objects. A flash units light typically operates in the tens of thousands of seconds range. In the right conditions a flash can freeze a fast moving object much better than your cameras shutter.
What did you think of this tutorial?


+ 95


9 CommentsAdd a Comment
Gail on Sep 29, 2016


Thanks. Now I am ready to take some pictures!
CEBe on Sep 12, 2016
Finally, down to earth basics. Thank you!
Anthony E on Aug 26, 2016
Nice tutorial makes me wanna dust off the ol' 35mm... :)
On another note:
Fellow Photographers,
I recently purchased a Lighting Light Video Photo Softbox Umbrella Photography Kit Backdrop Muslin from Jet.com at an amazing price and am excited to share it with other fellow photographers. (see link below)
https://jet.com/product/Lighting-Light-Video-Photo-Softbox-Umbrella-Photography-Kit-Backdrop-Muslin/c5e1cfdb0681481ea79a769ffa44d410
I hope this helps others when making their next purchasing decision.
Have a great day!
Sincerely,
Anthony E
Jeanie on Jan 7, 2015
Very informative tutorial. thanks.
hollis sankar on Aug 23, 2013
Lovely photos. makes me want to get a 35mm again.
farhat abbas on Jun 16, 2010
wonderful explanations of the subject two thumbs up.
bangla on Oct 4, 2009
nature Model girls Banglar sharee Flower Gohona Bangla Hot Girl Bangla Hot Model Bangla Moncho Natika Dhaka Bangladeshi Dance Bangladeshi Farmer Field Bangladeshi model Girl with red shree Banglalink Best Sharee CTG-Cafeaxpo Fashion girl Cox Bazar Beach Cute bangla girl DITF VISITORS Girls Dhaka Dhaka Lucas motor Fashion Girl Diagold Model Girl Dihan Eid www.bangladeshwallpaper.blogspot.com Fashion Panjabi man Eid Kamiz Eid Sharee Fashion Girl Fisher Man Green Bangladesh Gulshan Lake Dhaka Laptop Fair Mahiya Model bibi Russel Moon pure movie girl Nazrul Nice Fashion girl Nice Girl bangla S.S.C or H.S.C Result Sara Model girl Shirajgonj Jomuna Dam Repair Badh Sports girls Style World fashion bangladesh Flag bangladesh University nature bangladesh wallpaper very nice girls
nice on Oct 3, 2009
i lick this site.
prasanna on Aug 29, 2009
ya this is very interesting to do well.

 Views : 5869
 Comments : 9
 Rating :
  Last Updated : Aug 9, 2007


