How to do a "Top End Rebuild" on a 2-stroke motor.


A step by step instruction/pictorial on how to change out a piston/rings etc on a 2 stroke motor.

NOTE: This procedure was done on a 2004 200SX, your machine may not look exactly
like this, but it should be pretty close. Also, this will detail the install after the teardown
since I had already performed the tear down prior to writing this. To perform the
teardown just go in reverse order.
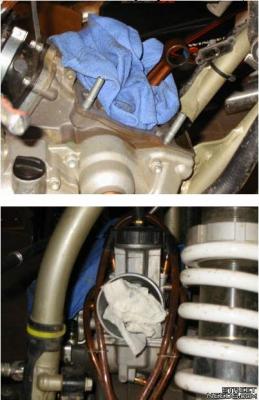
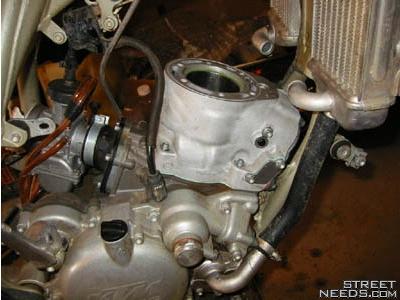
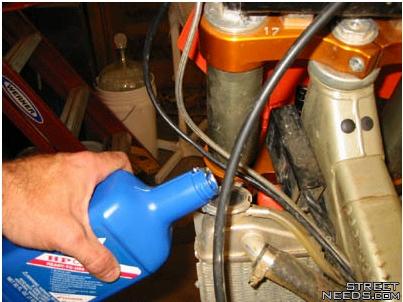
At this point your engine probably looks something like this:
(Note: Use rags to prevent dust from entering engine while the top end is disassembled)
like this, but it should be pretty close. Also, this will detail the install after the teardown
since I had already performed the tear down prior to writing this. To perform the
teardown just go in reverse order.
At this point your engine probably looks something like this:
(Note: Use rags to prevent dust from entering engine while the top end is disassembled)
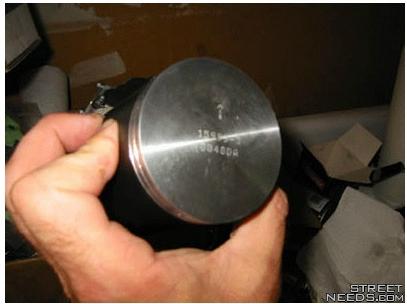
Now it is time to install the piston back onto the rod, here are the parts you will need
Piston
Ring(s)
Needle Bearing
Wrist Pin
Circlips
Piston
Ring(s)
Needle Bearing
Wrist Pin
Circlips
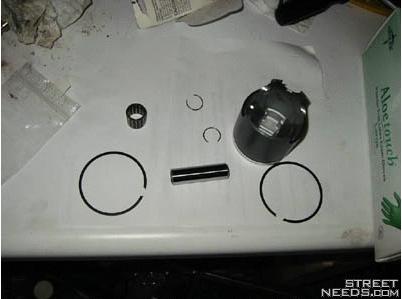
(For the observant, yes, this is actually a 200EXC two ring piston instead of a one
ring 200SX piston)
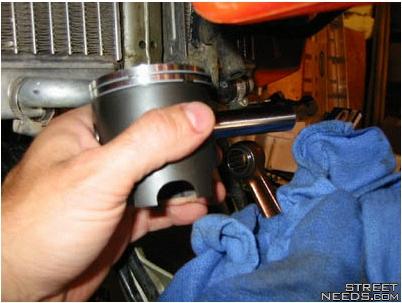
First, you will need to put the rings on the piston, if you have a two ring piston,
put the bottom ring on first. Be careful not to stretch the ring too much or you
will break it. Also, notice in the gap on the piston there is a pin that you should center
the gap of the ring on. (Hard to see, but on the top ring look between the ring gap)
ring 200SX piston)
First, you will need to put the rings on the piston, if you have a two ring piston,
put the bottom ring on first. Be careful not to stretch the ring too much or you
will break it. Also, notice in the gap on the piston there is a pin that you should center
the gap of the ring on. (Hard to see, but on the top ring look between the ring gap)
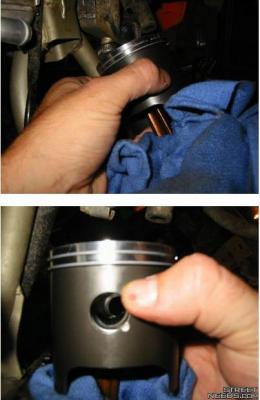
Next, put the needle bearing into the hole in the rod. I like to put a little 2 stroke oil
on the needle bearing so it has some lube at the initial start up.
Now, note the forward direction of your piston, this piston was easy, it
has an arrow stamped on it.
has an arrow stamped on it.
Next, insert the wristpin part of the way into the hole of the piston,
just enough to hold it in there.
just enough to hold it in there.
Set the piston on the rod, and line up the hole in the piston with the
hole in the rod and needle bearing assembly. Make sure the piston is
facing the right way.
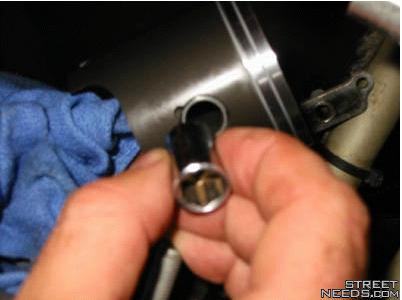
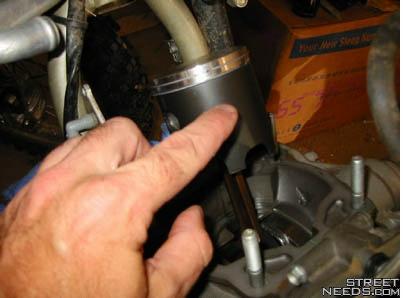
Push the wristpin through the piston and needle bearing until it is
flush with the piston.
flush with the piston.
A socket can be used to help you push, just find one that is the
right size.
right size.
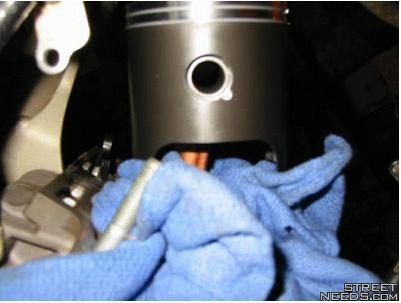
Now it is time to put in the circlips that hold the wristpin in place.
NOTE 1: This is another good time to make sure that you have a
rag in the opening to the lower end. These clips are springy and
tricky to get in. You don't want one falling into the bottom end!!!
NOTE 2: Some people may prefer to install one of the circlips prior
installing the wristpin. That way you avoid having to install two
circlips over the open bottom end.
NOTE 3: Notice how the open ends of the circlip is not lined up
with the dimple in the hole of the side of the piston.
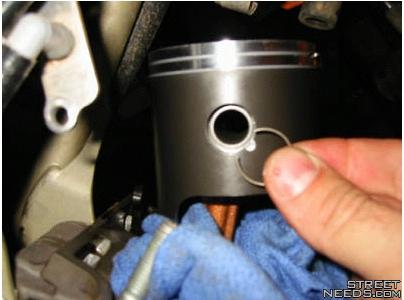
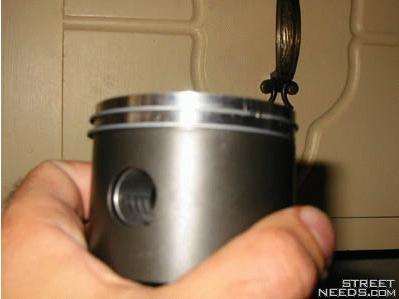
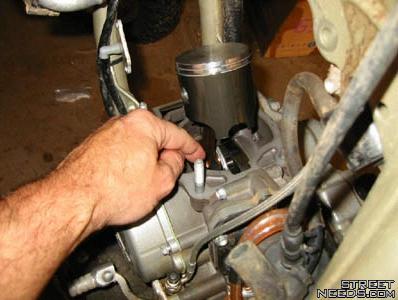
There is a ridge on the inside of the hole in the piston that the
circlip seats into. I usually stick one end of the circlip in the groove
then squeeze it with my fingers to get it the rest of the way in. You
may need to push it in a little more with a flat blade screwdriver to
get it seated properly. You can see the ridge in this picture just on
the far side of the dimple in the hole in the side of the piston.
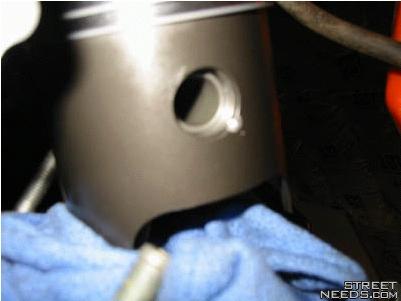
Install the 2nd circlip in the other side of the piston in the same manner.
Put a little premix on the skirt of the piston.
Put a little premix on the skirt of the piston.
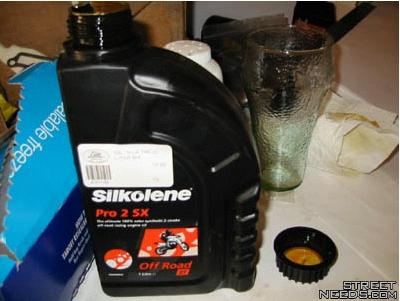
Also put some premix on the crank in the lower end. Just enough to
cover it lightly.
cover it lightly.
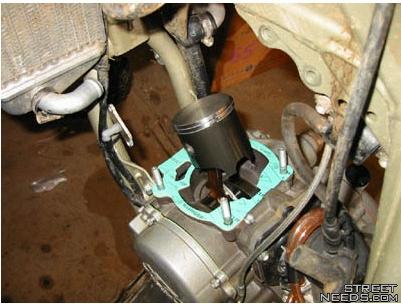
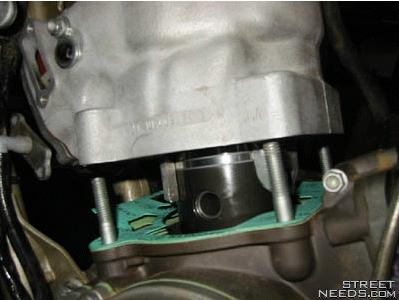
Install the cylinder base gaskets, make sure the metal surfaces are clean
and free of diirt and/or grease.
NOTE: Notice there are 3 gaskets in my particular application. This is to get the
"X" dimension right. I put the thinnest gasket in between the other two.
and free of diirt and/or grease.
NOTE: Notice there are 3 gaskets in my particular application. This is to get the
"X" dimension right. I put the thinnest gasket in between the other two.
Now it is time to install the cylinder.
NOTE: An extra pair of hands comes in real handy during this particular step.
Either to hold the cylinder, or to compress the rings. Especailly with a two
ring piston.
NOTE: An extra pair of hands comes in real handy during this particular step.
Either to hold the cylinder, or to compress the rings. Especailly with a two
ring piston.
Position the cylinder above the piston, try to have the cylinder lined up
with the mounting studs so that after installing the cylinder over the
piston you do not need to twist the cylinder to get it to line up with the
mounting studs.
Squeeze the ring(s) with your fingers so that they compress and fit into
the cylinder.
NOTE: Make sure the ring gap is lined up with the positioning pin in the
groove of the piston. Otherwise, if the ring is sitting over the pin, you
will not be able to compress it enough for it to fit in the cylinder.
NOTE: Sorry no pictures of that last step since I did not have a helper
and both hands were occupied.
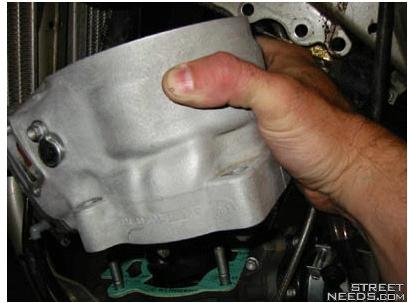
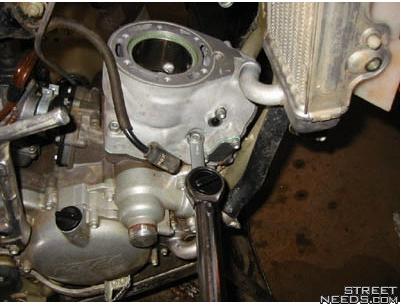
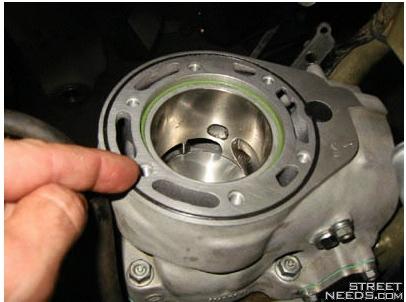
Here is a picture of the cylinder with the piston installed.
with the mounting studs so that after installing the cylinder over the
piston you do not need to twist the cylinder to get it to line up with the
mounting studs.
Squeeze the ring(s) with your fingers so that they compress and fit into
the cylinder.
NOTE: Make sure the ring gap is lined up with the positioning pin in the
groove of the piston. Otherwise, if the ring is sitting over the pin, you
will not be able to compress it enough for it to fit in the cylinder.
NOTE: Sorry no pictures of that last step since I did not have a helper
and both hands were occupied.
Here is a picture of the cylinder with the piston installed.
Before sliding the cylinder all the way down, make sure that the powervavle
actuating arm lines up with the receiving fork in the cylinder directly above it.
Slide the cylinder down all the way.
actuating arm lines up with the receiving fork in the cylinder directly above it.
Slide the cylinder down all the way.
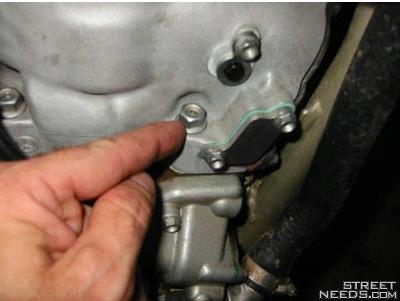
Open the side door and verify that the powervalve actuating arm did in fact
get seated in the receiving fork. Then put the side door back on.
get seated in the receiving fork. Then put the side door back on.
Install cylinder base nuts.
Check the "X" dimension, refer to owners manual for instructions.
Torque the cylinder base nuts down to the value specified in the owners
manual.
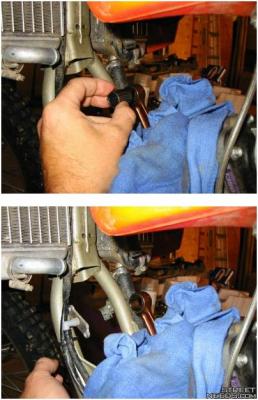
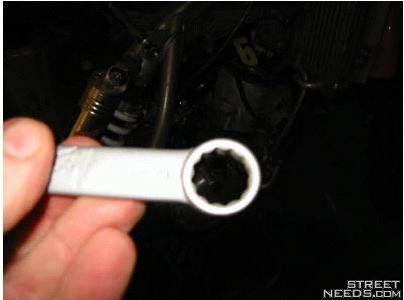
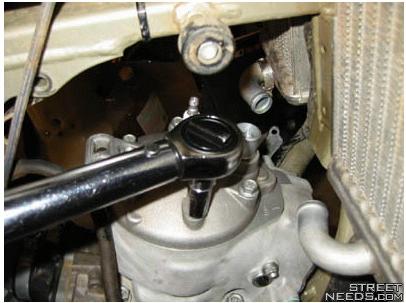
NOTE: Now you are asking yourself, how do you get a socket on the cylinder
base nuts in order to torque them correctly? The way I did it was to grind
down my motion pro torque wrench adapter.
BEFORE:
Torque the cylinder base nuts down to the value specified in the owners
manual.
NOTE: Now you are asking yourself, how do you get a socket on the cylinder
base nuts in order to torque them correctly? The way I did it was to grind
down my motion pro torque wrench adapter.
BEFORE:
AFTER:
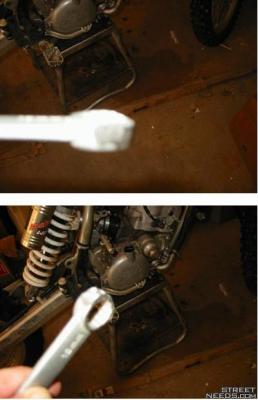
I hated to do it, but it was the only way to get the nuts torqued correctly.
Torque the nuts down, tightening each nut a little bit at a time in order to
acheive uniform torque readings.
Torque the nuts down, tightening each nut a little bit at a time in order to
acheive uniform torque readings.
NOTE: If you use a motion pro torque wrench adapter, make sure to adjust
the torque setting on the torque wrench accordingly.
Install the o-rings into the top of the cylinder. A little assembly lube will help
to keep the o-rings in place.
NOTE: You engine may have a cylinder head gasket instead of o-rings.
the torque setting on the torque wrench accordingly.
Install the o-rings into the top of the cylinder. A little assembly lube will help
to keep the o-rings in place.
NOTE: You engine may have a cylinder head gasket instead of o-rings.
Install the head, and torque down the head bolts to the value specified
in your shop manual.
in your shop manual.
Install the engine braces.

Install the cooling system hoses.
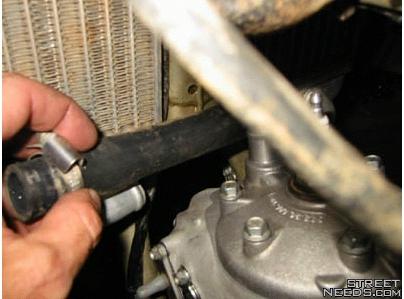
NOTE: When installing the hose that connects to the head, near the spark plug,
make sure the face the tightening screw away from the sparkplug. This makes
it easier to get a wrench on the sparkplug.
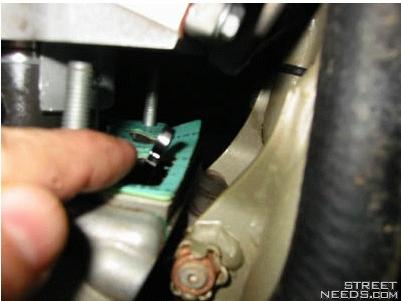
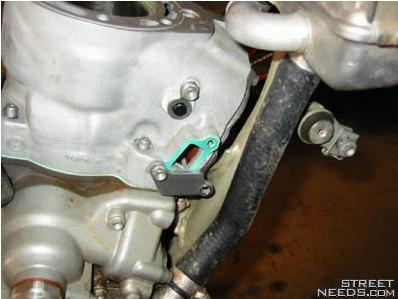
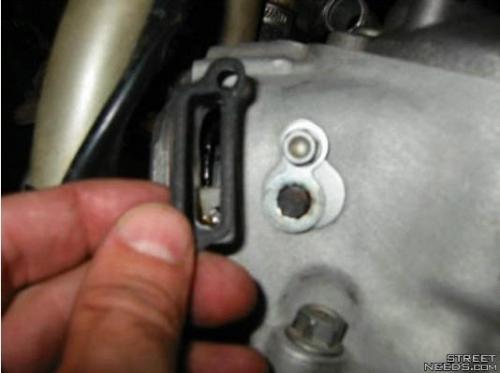
Install the powervalve setting indicator gasket and breather hose.
(Left side of cylinder)
make sure the face the tightening screw away from the sparkplug. This makes
it easier to get a wrench on the sparkplug.
Install the powervalve setting indicator gasket and breather hose.
(Left side of cylinder)
Install a fresh sparkplug. (Aren't you glad you left room for the
sparkplug wrench?) Don't forget to put on the sparkplug cap.
sparkplug wrench?) Don't forget to put on the sparkplug cap.

Add fresh coolant.
Put on the tank, shrouds, and seat. You are done!
Turn on the gas, hold your breath, and kick her over!
What did you think of this tutorial?


+ 428


44 CommentsAdd a Comment
Jacob Armstrong on Oct 16, 2017


Thanks we need more people like you, I feel like i get a better understanding this way. Instead of just reading a whole page to realize it doesnt answer the question, the pics help. Thanks again!
Krystl on Mar 15, 2016
Did you have a baby oring that you replaced when doing the top end rebuild? It would be about a quarter inch O.D. I'm nearly done putting my 1999 Ktm 200 EXC back together, but I can't seem to find where this goes, but I do know it should go somewhere. And yes, I've checked the service manual but I can't seem to see where it would go still. Thank you! Probably something easy I am overlooking..
Geek1945 on Oct 28, 2013
This may seem overdone, yet I was taught to seal all permeable gaskets with shellac. The thought was forming an air-tight bearer as the gasket holding pressure varies with engine expansion and cooling.
This may be out of date (like me), but I never had any gasket leak either. Ed
tomotho on Oct 21, 2012
PLACING THE PISTON IN UPSIDE DOWN. check when you remove the old piston where the cut out area is on the skirt of the piston (usually at the top) and make sure you put the new piston in the same way.
william groh on Aug 6, 2017
which way is the cut out area on the skirt of the piston the motor is robins 244cc 2 stoke
tomotho on Oct 21, 2012
RINGPINS-are sometimes difficult to insert-the nack is to insert 1 end into the slot first,and then bend the hooked end in
tomotho on Oct 21, 2012
really excellent,but like others,working on a small 50cc to get the rings into the cylinder aligned with the "dots" is an absolute pig.In the end I found the solution was to slide the piston into the cylinder and then attach the whole to the conrod.
ferej ibrahim on Jul 30, 2012
It is so good,I like It!!!!!!
Steve on May 10, 2012
I have a 85 rm 125 just waiting on the wiseco piston kit then will be doing this aswell ...does anyone know what I may need to torque my bolts at ? Also any other handy tips!!! I have never done before hoping it's not easy to fuck up!!
Tyler on Apr 18, 2012
I have a 2005 yz 125 and the stock bore is 54mm would it have wore any bigger or should it still be 54?
Brodie on Aug 23, 2012
the bore size should be the same. i just rebuilt my 2006 yz125 and it was 54mm
Jake on Feb 8, 2012
I have a 2005 Suzuki RM85L and I am going to rebuild the top end he soon. I understand how to do it but, after i get it put back together can I just ride it? or do i need to like "break in" the new top end?
Crazy legs on Jan 18, 2012
2 strokes make me laugh, in a good way.
bringggg ding ding ding ding.
lalsangpuia on Jan 6, 2012
how to port a 2storke bike a racer
Stuart on Jul 9, 2011
Hi do u no the ktm 200 torque spec
mark on Nov 8, 2011
Cylinder nuts: 30 nm
head bolts: 18 nm
Blake Cook on Jun 20, 2011
Great instructions, thanks for the help!
John on May 30, 2011
Just a little variation. As one person commented it's hard to get the rings into the cylinder so I prefer to set thr jug uside down on the bench and start the top of the piston and rings into the cylinder just making sure not to put it in past the wrist pin. Then set the whole jug and piston over the connecting rod and install wrist pin and clips. It does help to have an extra set of hands but, I have done it by myself. The only problem I have ever run into is not having enough room but, 90% of the time theres no problem.
camo on May 10, 2011
the only way i learnt to do a top end is by pulling the bike apart and learning from mistakes an its good to see sites like this but i also think that you wont learn untill you give it a go but 10 out of 10 in yu job mate
Tony on Feb 21, 2011
Great job. very easy to follow. now i know what I need to do. I need to drop my bike off with my mechanic! This is too much for me...
The 300 on Jan 30, 2011
Is the inside of a 1999 300 exc chrome plated?
marlyjustin on Dec 6, 2010
wow you did a swell job. If I was a man or had my bike I think this would really help. I think this is great.
Cody on Oct 6, 2010
hey i have a yz85lw 20009 model would that be Simular to rebuilding it
i am me on Feb 8, 2013
Simular?? what is a simular?
jordie on Feb 15, 2010
thanks for all the step-by-step pics.
Jeremy Zook on Feb 11, 2010
is there any difference in the specs of a 2000 or 2001 rm125?
Jeremy Zook on Feb 11, 2010
hey thanks for the help. i need to rebuild my brothers 2001 rm125 and i cant find a manual for a 2001, but i can for a 2000. is there any difference in specs?
Earl Schaad on Feb 1, 2010
Excellent, rebuilt a lot of car motors but never a 2 stroke. Thanks for the help.
chris on Oct 28, 2009
do you put the clips facing that little opening or no
Hills Cycle Service on Sep 11, 2012
You put the wrist pin clips(circlips) in facing opposite of the opening.
Jerry on Jul 10, 2011
most likely not it would be harder to get them off but dont take my word for it because i am not sure.
06cr125r on Jul 24, 2009
did you do anything to the cylinder?? my parts guy told me i should send it away to get tiny tiny grooves in it so the oil will stick better.
kyle on Apr 19, 2011
it is called honing and isnt necessary for every single topend job
Tony on Feb 10, 2009
cool man now i dont have to pay to have the shop do it thanks alot
dick fitswell on Apr 18, 2009
hey man, the average 2 cycle engines are easyr to work on then fixin a flat but its the dreded 4 STROKE that are hard, I hate valve seats
Jake on Feb 8, 2012
Hi dick! nice name
sam3664 on Feb 2, 2009
nice posting
Suzuki Rider on Jan 14, 2009
good job man...every thing worked perfect...
and i had it done in about 45 min. but seating tha rings to go into the cylinder was a pain for me......
king on Oct 23, 2008
After you rebuild your 2 stroke engine put the gaskets and seal, do you actualy put an amount of oil in the engine before the Gas Air oil Mixture expolde's in the crank case.
If yes, what is the amount and what type of oil?
i saw your Tutorial,"very cool"
Kirby Lachance on Oct 10, 2008
Thanks for the tips. Very helpful.
I have not done this for a while. Makes me want to do it more in the future.
Jimmy Myers on Sep 4, 2008
A bore and piston gauging is appropriate prior this process, ensure you have the correct clearances as per owners manual. Its also important to check the play in your connecting rod to eliminat piston slap. Check the condition of the wrist pin bearing in the rod as well.
If the contact faces of your cylinder or head are scoared be sure to file them flat to ensure the gasket seals correctly. Height miss matches between vertically split case halfs are an issue as well, ensure this face is even.
mikie on Aug 3, 2008
alot of help thaqnks so much
joseph on Jul 10, 2008
did it in no time thanks for your help. last time I did something like this was as a teenager
Theron Laforce on Apr 26, 2008
thanks 4 ur help

 Views : 26162
 Comments : 44
 Rating :
  Last Updated : Aug 7, 2007

