How to Pimp Out Your Myspace Page With a Div Overlay


Skills needed: basic Photoshop skills, basic understanding of HTML, common sense
Programs needed: Photoshop (I'm using Photoshop CS2), a webhost (either your own or I recommend Photobucket.com - reasons will be covered later on)
A div overlay is actually very simple to do. The hardest part is actually creating the design you want. Your design is only limited by your imagination.
Other examples of my designs:
My Myspace page: http://www.myspace.com/backslide
My first version: http://www.calviniscool.com/myspace/calvin/v1/
A page I designed for my friend: http://www.calviniscool.com/myspace/jake/
For the purposes of simplicity, the design for this tutorial will not be complex. Also, this will be a div overlay without comments showing. Getting your comments to show on a div overlay involves some skills that are beyond the simple skills needed for this tutorial and therefore, will not be covered.
I start off with an image that I want to use for my div overlay. I edited a picture of Kate Beckinsale and made it a vector and gave it a slightly retro feel. 
Add the links you want onto the base image. Again, for the purposes of simplicity, all my links are simple text. You can use images if you want. You can add or not add whichever links you want. 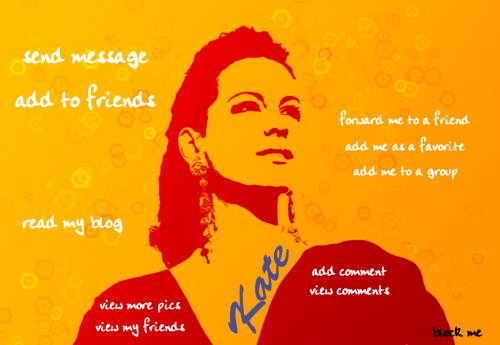
In Photoshop, select the Slice Tool. It looks like a little Exacto knife. The Slice Tool allows you to (*gasp*) slice up your image. 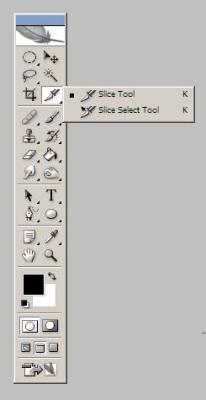
Using the Slice Tool, you will be slicing your links. You will accomplish this by starting from one corner of the part you want to slice, clicking the mouse button and while holding the mouse button down, dragging the cursor to the other corner. 
Once you let go of the mouse button, a part of your image will be sliced. If you need to change the dimensions of the slice, click and drag the boxes on the slice. 
Slice out the rest of your links and you will have a bunch of blue boxes showing on your image. These are your slices. 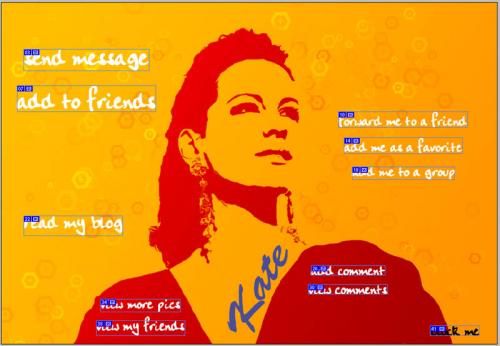
If you use the Slice Select Tool, you will see an option at the top to Show Auto Slices 
If you click this, you will see all the slices that Photoshop automatically does for you. Your slices are the ones with blue numbers and the automatic slices are the boxes with grey numbers. Personally, I like designing with the Show Auto Slices option turned off. It makes it easier to see my own slices and makes it easier to edit if I have to. 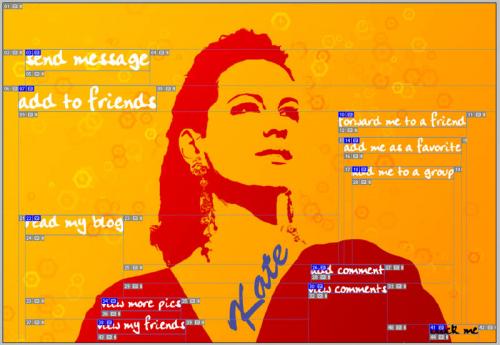
If you decide to move a text link, don't worry, you won't have to reslice the whole image. All you have to do it move the link and then using the Slice Select Tool, move the slice to the new location.
Now that the designing part is done, it's time to get your image ready to be put up on Myspace.
From the File menu, select Save for Web. 
This will bring up the Save for Web screen. Again, you can see that Photoshop has separated your slices from the automatic slices by making your slices a little darker than the automatic slices. You can move the image around by holding down the Space Bar and clicking on the image and dragging it around. 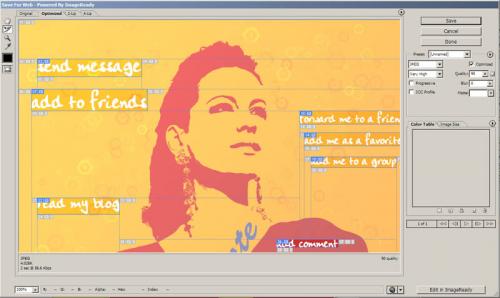
Time to add the links. Do this by double-clicking on one of your slices. This will bring up the Slice Options screen. 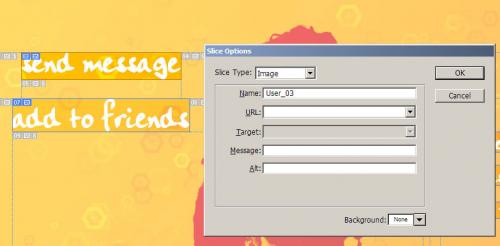
There are two ways to get your links. The first way is to view your profile. From there, simply copy your links. There are a couple of links that have a "&MyToken=(bunch of random letters and numbers)" added to the link. It is ok to delete everything from the "&MyToken=" part back. All the other links, keep them intact.
The second way is from a website that has been a secret for us div overlay designers for a while. And I will now reveal it to you.
It is a website that has several generators as well as tutorials. Be warned, the website is popular and sometimes, it will load very slow. Be patient and it will load. On the right, on the menu, click on Div Overlay Model. Near the bottom of the screen, there is an Essential Links & Codes for Overlays section. All you have to do is enter you Myspace link and it will generate the links for you. However, I found this to be extremely slow as it pulls the links from Myspace itself. So if Myspace is slow in addition to the slowness of bbz, the links will either take an extremely long time to be generated or might not be generated at all. It might be easier, but it would probably be quicker to get the links yourself.
Once you have all your links, add them to each link and then you are ready to save. Remember you are saving JPEGs and I like to use 90 as the Quality. Click Save and save it to a folder. Photoshop will generate the HTML and the all the appropriate images. You can now test out your new design by opening the HTML file Photoshop created and see your page.
You have to now upload your images. I have my own website so I just host my div overlay images there. You do not want to use a temporary uploader that will delete images on a regular basis. The reasons are pretty self-explanatory. Like I mentioned on top for the Programs needed, I recommend Photobucket. Go to the folder that you saved your design to and open up the Images folder. If you open up a couple of the images, you'll see that these are the slices of the whole image. You will have to upload all these images.
Once you have uploaded all the images, you will need to edit your HTML page. Open up the HTML page in Notepad. Using the Replace option, you will be replacing all the links. In Find What, use "images/" and replace it with your Photobucket folder or the folder on your website. Use Replace All. Be sure that your links are either fully enclosed within two quotation marks or don't have quotation marks at all. 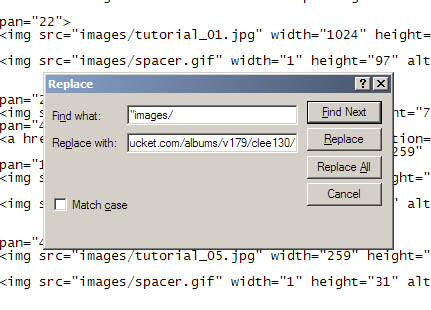
Save this file as a HTML file with a different name than the original just in case you mess something up. I usually just add "-online" to the original filename and that way, I know it has online links to the images. If you did everything correctly, if you open up the HTML file with the online links, it'll look the same but with your images being loaded from a website instead of from your harddrive. This is also a good way to see if you uploaded all your images especially if you uploaded to Photobucket. Having to upload 30+ images, you might have missed one. If there is a blank spot in the middle of your image, you probably missed the file when uploading to Photobucket.
Once the HTML file has been edited and the images uploaded, you are ready to edit your Myspace page. Sign onto Myspace and edit your page in Safe Mode. I usually clean out everything. All my Interests & Personality, my Schools, Company ... I make it a clean slate.
Go back to http://www.bbzspace.com/ and go to the Div Overlay Model page. Select full screen. Use whatever Background Color and Div Background Color you want. However, it would make sense to make it a color that compliments your design. You find the background color of your design in Photoshop by using the Color Picker and copying the hexidecimal number. 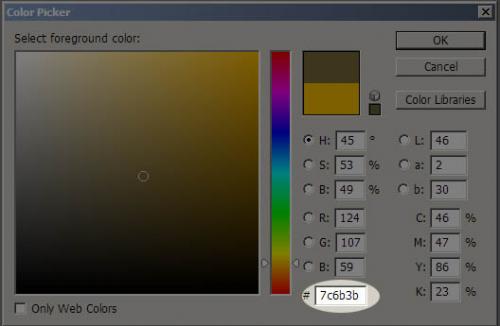
Or you can use black or white. Black is 000000 (all zeros) and white is ffffff.
I usually use "None" as the Div Border Width and therefore, don't need a Border Width, Color or Style. I also usually leave the Text, Link, and (Comment) Header Colors blank. Check "Hide Top Links" if you want to hide the top links. I suggest you do so. It makes it look a lot better. Also check "Hide Comments". If you don't check it, your page won't look as good in my opinion. It also takes a bit more manipulation that isn't covered in this tutorial. Generate the code.
Once the code is generated, you're almost done. As the bbz directions state, copy the first block into your Interests & Personality section. You can delete all the text in between the first tags including the tags. It won't affect anything. This first block is telling Myspace to hide certain things and display other things. Take a look at the code. In the ".div1" section, you'll see a width and height. Change the pixels to the width and height of your image. You can make it a pixel or two larger than your image to be safe. In my case, it was width:1025px and height:708px. You'll also have to change the margin-left to half the amount of your width. In my case, it would be margin-left:-512px. This is so your overlay will be centered. Also change the overflow: from auto to inherit. You shouldn't have to mess with anything else. Click "Preview" and then "Submit".
The second block is where you'll be putting in the HTML generated by Photoshop. Copy the second block into your Music section. You will be putting your own content right under the tag. So delete everything in between the [div class="div1"] and first [/div] tags.
Open up your HTML page with the online links in Notepad. At the top, start selecting from "[table id=" until the ending [/table] tag. 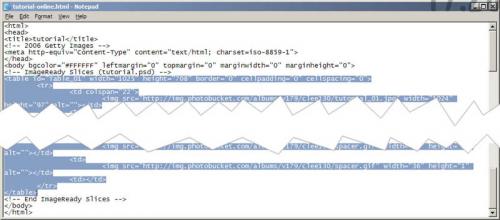
Copy the selection and put it in between the [div class="div1"] and first [/div] tags. Click "Preview". You should now see your overlay. Click "Submit".
You're done. Click on "View My Profile" and you should see your div overlay.
Note: This tutorial WILL NOT cover up your ads or remove them. If you remove or cover up your ads, Myspace will most likely ban you and delete you account.
Here is the tutorial design hosted on my test profile page: http://www.myspace.com/thelightisfading
Adding Comments to Your Div Overlay
Use bbzspace's div overlay generator. However, remember to uncheck "Hide Comments".
Copy and paste the codes as given to you. Be careful because the generator has now given you an extra line of code to be placed into your "Who I'd Like To Meet" section. Remember to put that line of code in.
Take a close look at the code you will be placing into your "Interests" section. The highlighted section deals with how your comments are displayed. 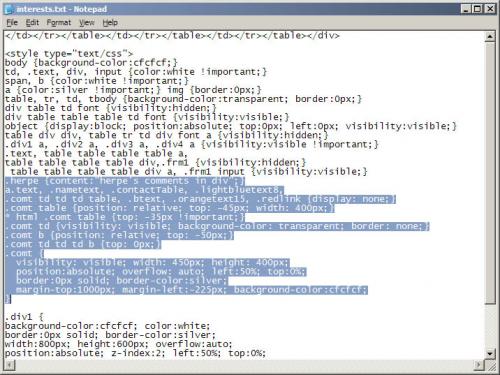
Quick lesson on "position: relative" top: -45px = moves up 45px top: 45px = moves down 45px left: -15px = moves left 15px left: 15px = moves right 15px
This highlighted part represents how far up from the bottom of the screen the bottom of the comments are. If it -100, then then bottom of your comments will be 100 pixels up from the bottom of the screen. If it is 0, then the bottom of your comments will be sitting at the very bottom of your screen. Edit to your preference. Something like 25 or 30 pixels is a good amount. 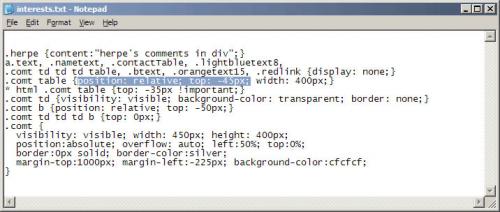
If you want to have your comments scrolling, use the default overflow:auto. However, if you want your comments to be all displayed without a scrollbar, use overflow:inherit 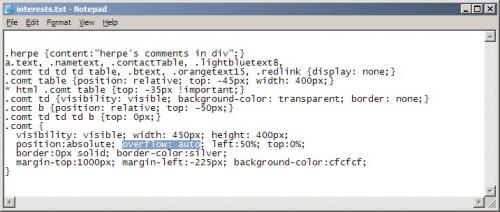
This number deals with how far down the top of your comments section will be. This depends on the height of your design. A good number is about 100 pixels greater than the height of your design. You'll have to do some experimenting. 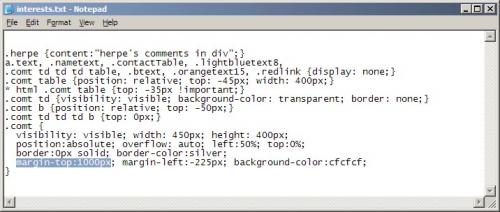
Once you are satisfied with the results, simply Preview and Submit and you will have comments at the bottom of your div overlay.


 Views : 11499
 Comments : 13
 Rating :
  Last Updated : Aug 14, 2007


