Build a Magnetic Stirrer From An Old Computer


In this tutorial, I will teach you how to build a magnetic stirrer for laboratory use from old computer parts. Among other things, magnetic stirrers can be used in titrations and to speed up gas-forming reactions.
Safety
- Electricity can be dangerous! When opening up a computer, make sure it is unplugged! Occasionally, touch the computer chassis or other nearby metal object to discharge potential static charge.
- If you are careless, you can easily burn yourself when soldering. Always wear safety goggles when doing so to protect yourself from vaporized flux.
- The magnets inside hard drives are abnormally strong! Keep them away from computer monitors, floppy drives, and other electronic devices.
- Hard drives spinning at full voltage rotate fast so be aware of your fingers!
Materials & Tools
- One old desktop computer tower
- The power supply needs to be working and the hard drive needs to be able to spin. Most "broken" computers will work perfectly for this purpose.
- Various screwdrivers and screws
- Plexiglass or some type of hard plastic
- This is used to form the top of your magnetic stirrer. It should be fairly thin and you will need to be able to drill through it. It cannot be metal.
- This is used to form the top of your magnetic stirrer. It should be fairly thin and you will need to be able to drill through it. It cannot be metal.
- Drill with appropriate bit size
- Large piece of wood
- Use this to mount your stirrer to.
- Small pieces of wood (about 1/4" thick)
- Use these pieces of wood to hold up the lid of your magnetic stirrer just above the rotating magnet.
- Use these pieces of wood to hold up the lid of your magnetic stirrer just above the rotating magnet.
- Clamp
- Wire cutters
- Teflon tape
- Resistor
- You can buy these at Radioshack or similar electronic stores for $2 or so. The size that you will need depends upon the voltage your power supply gives off and the minimum amount that will still allow your hard drive to spin. This will take some experimentation.
Construction
- Locate the hard drive and power supply of your computer and remove them from the tower of the computer. There should be a set of wires going from the power supply to the hard drive. Keep these wires connected for now.
- Plug in your power supply (you may or may not have a power cord already in there) and see if everything runs properly. If a fan doesn't go on, your power supply is most likely dead. If the hard disk doesn't start making noise and the fan is going, then it is probably dead.
- Unscrew the casing of the hard drive. The inside should look something like this:
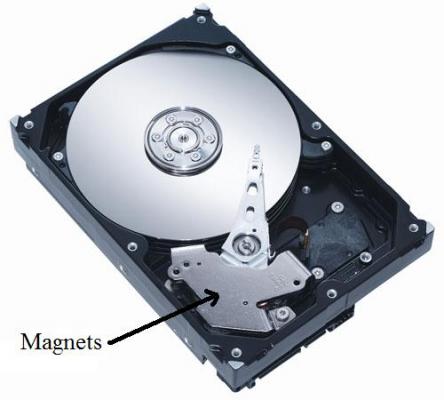
- Remove and discard the arm.
- Extract the brackets that contain the rare-earth magnets and save their screws. These magnets are made out of neodymium, iron, and boron and are much stronger than your average iron magnet!
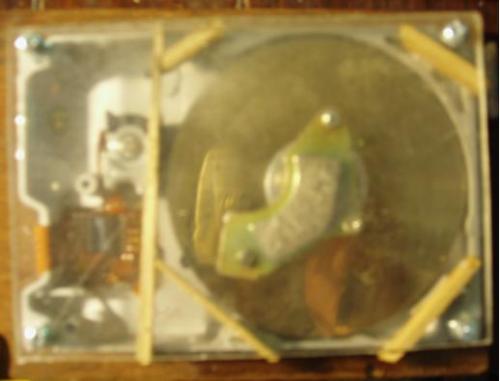
- Drill three holes into the circular disk itself and fasten the magnet bracket to the disk with the magnet facing upwards.
- Drill four holes in each corner of your piece of plexiglass and fasten it over the top of your hard drive with long screws. You will have to use screws that are longer than the thickness of the plexiglass and raise the lid up with small pieces of wood as shown. Otherwise, the magnet will rub against the lid and it will not be able to rotate freely. Try to keep the plastic lid as close to the surface of the magnet as possible (without hitting it of course).
- Mount the hard drive to a piece of wood and clamp this down to a table.
- Plug in the power supply for a couple of seconds. The hard drive will rotate extremely fast! With a heavy magnet on top, it now has enough torque to move all around so this is why it is important to seurely clamp the hard drive down.
- Now it's time for some minor electrical work. The hard drive is powered by one 4-prong connector. Two of the wires going into this connector are the same color and the other two are distinct colors. Cut and splice one of the wires that has a distinct color and attach a resistor in series to it. This will limit the amount of voltage going into the hard disk drive and lower its speed. Solder the resistor to the wires or just attached them and wrap with electrical tape.
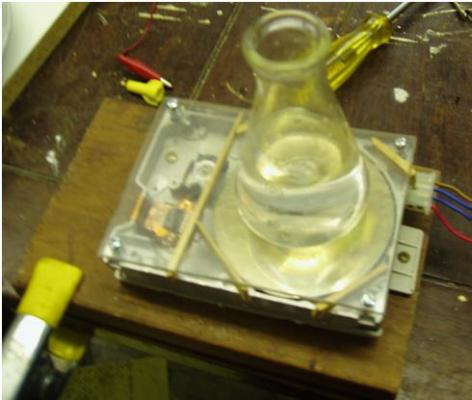
- If you want you can built a stand on top of the plastic lid to hold your flask (or whatever container you are using) in place. This is not necessary, however, if you operate your stirrer at low speeds.
Operation
The only thing you have left to do is make your magnetic stirbar. You can buy a bunch of these pretty cheaply if you really want to, but I find that wrapping a large steel screw or nail in Teflon tape works almost equally as well. The tape prevents it from reacting with the chemicals in your flask.
I recommend that you build a wooden stand to hold your container in place if you are going to operate your sitrrer without monitoring it. Your container will probably slowly move around a bit.


 Views : 4888
 Comments : 3
 Rating :
  Last Updated : Aug 12, 2007


