Building a Ball Mill for Grinding Chemicals


Background
Ball mills are used in chemistry and in industry to grind hard solids to a very fine powder. They are very similar to rock tumblers. Basically, the idea is to rotate a container filled with heavy metal balls that crush the substance that you want to grind. Ball mills can be used to grind ceramic material, crystalline compounds, and even some metals.
Safety
- NEVER use a ball mill to grind pyrotechnic preparations! The steel balls used in the ball mill described in this tutorial can spark and easily ignite and explode such mixtures! Other non-sparking material may be used, but this will not be described in this tutorial.
- If you are grinding metals like magnesium, aluminum, etc., or other material that is readily oxidized, use small quantities and periodically (every two hours or so) turn off the mill and let the container COOL to room temperature. Then slowly open the lid of the container and allow oxygen to enter. Tiny reactive metal particles formed in the mill will react with oxygen in the container and formed a microscopic oxide layer. However, if the metal consumes all the oxygen in the container and you open it while it is hot, there may be enough heat generated to ignite the entire mixture! That is why it is crucial to periodically let air in the container.
- Wear a dust mask when opening up your container. Small particulates of the substance being grinded will be released into the air and this is not too good for your lungs.
- Be careful of catching your hands or clothing into the rotating belts and pulleys. I suggest that you build a wooden guard around any fast-moving shafts to protect yourself.
- Don't attempt to construct a ball mill if you do not know how to safely operate power tools like a drill or saw.
Materials & Tools
Note: If you are clever, you can substitute most of these materials with other household items or things you may find in dumpsters. Also, the sizes used are just what I used in my mill and are here to give you a general idea.
- Motor
- Have an open when searching for this. It is definitely the most expensive and most important part in your ball mill, but if you look around enough you can surely find one for free. The motor should probably run at a least 500 rpm. Higher is fine; it'll just mean you'll need a greater reduction ratio. Here are some items that are good sources of motors and are often found in junk piles:
- Bench grinders
- Dishwashers
- Dryers
- Washing machines
- House fans
- Swamp coolers
- Electric drills (use only in desperation)
- Container
- This should probably be some kind of hard plastic with a screw-on lid. You could also use a metal food can but you'd have to find a way to fasten the lid back on. It is best if the container is completely round. I used a plastic Grey Poupon mustard container which has a 3.5" diameter and is 8" high. The size of your container is dependent on how large of an operation you want to run, but keep in mind its maximum size is also somewhat dependent on the power of your motor.
- Grinding Material
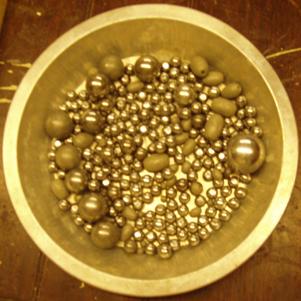
- I used 100 3/8" steel balls used as an ammunition for a sling shot. They cost me $8 at a local sporting goods store. I supplemented this with some random ball bearings I had and some lead fishing weights. Lead and steel are two cheap materials that are very strong. Steel is pretty nice because you can easily separate the balls from your mixture with a strong magnet. You could also try glass marbles, but they will occasionally break and will not be able to grind metals. Whatever is used does not necessarily have to be spherical and they don't have to be uniform in size either.
- Here is a picture of a variety of grinding medium that I use:
- Two pulleys
- One pulley should be large and the other should be small. The sizes of the pulleys will depend upon the speed of your motor and the size of your axels. It is easiest to buy these from a hardware store. They will cost about $10 for both of them. If you want, you could also try to make your own out of wood.
- Belt
- I had a large enough one lying around, but you can buy one for pretty cheap. It just has to be long enough to fit around both pulleys. I am not sure what you could substitute for this but there must be something.
- 2 Axles
- I used wooden dowels- 3/4" for the shaft and 5/16" to run through the container. It is probably a good idea to not use wood for the latter because it will slowly take a beating and spray a little bit of saw dust into your mixture. You can also use:
- Metal rods
- PVC pipe
- Metal pipe
- Large piece of wood or particle board
- You will mount all of the parts of your mill to this.
- Several scrap pieces of wood (2 x 4s work well)
- Wood screws
- Screwdriver
- Handsaw or skill saw
- Drill with appropriate bits
- Scissors
- Glue or caulk (anything you've got)
- Allen wrenches
- Friction tape
- You will wrap your container in this to help it grab the rotating shaft. You could probably substitute it with anything that works as a mild abrasive (maybe sandpaper?).
- Motor oil
- This is very important because you need to lubricate all of your connections and makeshift bearings. If you don't, you'll have so much friction that nothing will rotate. Almost any oil or similar lubricant will work.
- Bearings
- You can get these from hardware stores although they are a bit more expensive than pulleys and belts. The best ones to get are called pillow mount bearings. I used two of them because I had some old ones in my shop, but I will teach you how to make your own from wood.
- Rubber hose
- You will need this to put over your shaft so that it will turn your container. Any size will do even if it is too large or small for your axle. I got mine from an old dishwasher.
- You will need this to put over your shaft so that it will turn your container. Any size will do even if it is too large or small for your axle. I got mine from an old dishwasher.
Reduction Ratios
Your final goal is to get a container rotating at about 50-100 rpm. If it goes too slowly, the balls will just roll in place- too fast and the centripetal force will be too strong and the balls will just roll along the sides of the container. What you want is the balls to reach the top of the container and then come crashing down.
Let's look at my ball mill for example of how reduction ratios. It is important to understand this so that you can figure out what size pulleys you will need.
First figure out what the speed of your motor runs. Most motors should have it labeled, but if it isn't you'll have to time it yourself. This can be done by hooking up the motor to two pulleys with known diameters and then by counting how many times the larger pulley rotates in one minute.
My motor runs at 1725 rpm and I attached a 1-3/4" (diameter) pulley to it. This pulley turns a belt which in turn rotates a 7.5" pulley. This corresponds to a reduction ratio of 1:7.5/1.75 or 1:4.25. This means that my larger pulley runs 4.25 times slower than the motor or at about 400 rpm. The axle that the larger pulley rotates has a diameter of 3/4" (including the rubber hose) and it rotates the 3.5" container. This additional reduction of 1:3.5/0.75 or 1:4.67 means that the container should theoretically rotate at 400/4.67 rpm or about 85 rpm. I measured a speed of 80 rpm- the slightly lower speed due to frictional losses.
So basically your final speed will depend on 1) motor speed, 2) your axle and pulley diameters, and 3) your container diameter. Keep in this in mind when buying the necessary parts.
Construction
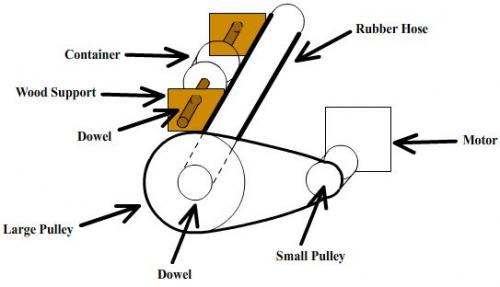
First take a look at this little schematic I drew up so you know what you are about to do.
- Mount your motor to your wooden base and attach the pulley to it. There is usually just a set screw that you will have to tighten with an allen wrench.
- Measure out the distance needed to place a wooden base (or bearing) so that the belt is as tight as possible. Make two wooden stands to hold your dowel. Be sure that you have enough clearance for your large pulley. Drill a hole with the diameter of your intended axel in two small pieces of wood. Both of the holes should be at the same height- you want this thing to be level!
- Drill four holes in your base (two for each stand) and through to the bottom of your wooden stands. Slide your axel through each of the stands and mount them to your base by screwing them in from underneath the base.
- Drill one 1/4" hole directly at the top of each stand and go right through to the top of your axle. Drip in lots of your lubricating oil through these holes.
- Attach your pulley to the axel by tightening whatever needs to be tightened (again probably a set screw). Put on your belt. It should be nice and taut.
- Cut open your hose and glue it around the inner part of the axle. If it is not the right diameter you will need to carefully piece it together so that it covers the entire circumference of the axle.
- Build your base for the container. Build two wooden stands as you did in steps 2-4 for the axle that will run through the container. Drill two holes in the container making sure that are straight across from one another. If the container is plastic, try not to make the connection a tight as possible. You can either have the container rotate over a stationary axle or have the axle rotate the container. If the holes you drilled are too big or you use using a metal container you will probably have to epoxy the axle in. This will ensure that the axle will rotate and the container will stay put.
- Wrap your container with friction tape. Make sure the surface of the tape is level.
- Cut another piece of wood the length of inner part of your axle for your container. Drill two holes on each side of the wood and through on to the inner side of each wooden stand. Fasten the wood piece to the two stands with screws.
- With a pencil, trace the location of the wooden stand where the container will rub rather tightly against the hose of the shaft. Drill two holes in the bottom of the wooden stand and on through the base. Mount it with two screws.
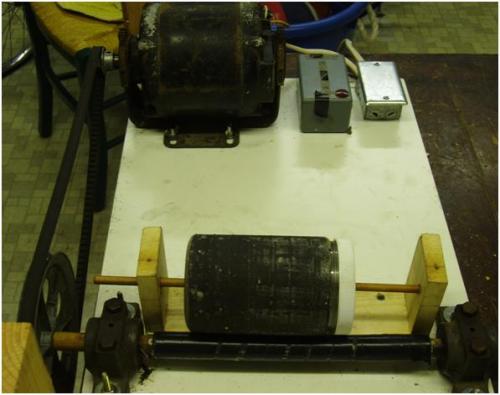
- Oil everything up, plug the motor in, and see if the sucker runs!
- Once the necessary adjustments have been made, build a wooden safety cover around you belt and pulleys. Your shaft and container will be moving slowly enough to do no harm, but it is important to cover the motor belt because this is moving very fast.
Operation
- Reread the safety points above.
- You should run the container with at least 1/3 filled with grinding medium. You can fill the container with about as much of the substance you want to grind, but leave some empty space for things to move around.
- Make sure to periodically oil everything up. This is a good time to make sure everything is running smoothly.
- Running a ball mill is quite noisy so it is a good idea to operate it in a closed room or basement.
- Normal materials will take a couple of hours to mill, but harder things like metals can take days or even weeks so be patient.
Uses
- Grind your own bird feed (obviously don't use lead balls for this).
- Grind sand for glass making.
- Grind metals like aluminum and magnesium. These metals can be used in reactions with metal oxides to isolate other metals.
- Grind your own green sand for use in metal casting.
- Grind a mixture of chemicals so that they will react faster when you put them in a furnace or otherwise heat them.
- Grind glass for use as a distillation column packing material.
Here is a short clip of the ball mill in action with the saftey cover installed:


 Views : 7710
 Comments : 11
 Rating :
  Last Updated : Aug 11, 2007


