Using a PS1 Exploit via ARMax (non Evo) to install FMCB 1/11


First off let me begin with this:
Free McBoot was not designed for you to pirate games. It was designed to allow homebrew applications to run from a standard PS2 Memory Card or connected USB device.
I dont encourage, support or even allow discussions of backups if you do not own the originals. Its ONLY legal as long as you own the original retail software. THat being said...GO BUY YOUR GAMES!!
Piracy is not just downloading from the internet. Its the copying and redistributing of the copy/copies in any form. Someone selling you or giving you a "copy" is piracy, since you did not have a right to posess one.
Then there is also "self piracy", the making of a copy of software you purchased, then sold, trashed it or was stolen from you, but kept the copy. It doesnt matter HOW the original was removed from your ownership, but the fact you no longer have rights to hold a copy of that software does matter.
Having the original in ANY shape, broken, scratched, water damages, heat damaged, etc., makes posessing a backup legal. Its for this reason we make backups, ONLY to preserve our original discs and the console equipment since they do not last forever. By making backups, we can enjoy our games far beyond the original discs lifespan permits.
Okay now that thats out of the way i can begin.
Using a PS1 Exploit via ARMax (non Evo) to install FMCB
Hardware needed:
* Playstation 2 - Must be a FAT PS2. Slimline models will not work for this tutorial
* A PS2 memory card. - No a MC for PS1 will not work.
* USB Thumb Drive - get a hold of several if possible, to ensure one will be compatible
Software Needed:
* Free MC Boot. [Official release ]. Or [Noobie Package ]
* uLaunchElf. Most all versions located [HERE ] Already included with the Noobie package
* HDLoader. HDL downloads [HERE ] Already included with the Noobie package
* Playstation 1 Video game - Must be retail. Copies do not work
* Action Replay Disc (PS2) - Non-evo and also must be retail.
* TitleDB Generator - Used in creation of PS1 Exploit - Download
* PS2SaveBuilder v0.8 - Download
Process:
Create The Exploit
Basically you need 1 single file on a USB stick (step 3.1 below), and to transfer this to a mem card. This exploit file is 'masked' as a game save file for the Memory Card's {MC} Your System Configuration save file you see on your MC. Once this file is on your MC it requires a PS1 Game to 'trigger' the exploit to run, instead of the PS1 Game by reading a special file called the TITLE.DB. So lets start with grabbing a PS1 game disc and create the TITLE.DB file.
First create a folder on your PC where we can put all the files we are going to use in, example: Exploit Files
Prepare files
TITLE.DB
-- Stick the PS1 game in your PC. Open My Computer and look at the disc title, or open the disc and look for a title like "SCES_019.79", "SLES_000.00", "SCUS_000.00" etc etc. This is the game's ID - remember it.
Option 1--You can use this Online TITLE.DB maker
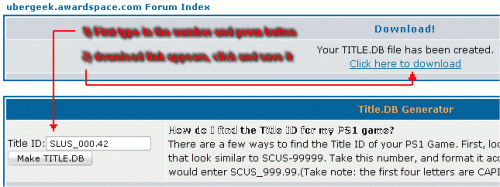
Save the file to the Exploit Files folder on your PC.
Option 2 -- Run TitleDB Generator, click the "get ID from CD button , click "Add", then click the "Save TITLE.DB" button. The TITLE.DB file will save in the same directory TitleDB Generator is run from.
Now right click the title DB file, click Open With..., select program from list, choose NotePad, and ensure the contents of the file reads like so...
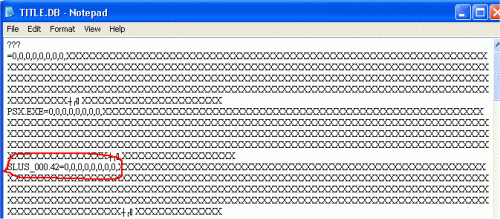
...where SLUS_000.42 is the ID you entered from the PS1 game. Make sure it is in this format, but might not be the same letter and numbers.
The underscore { _ } and period { . } are important to be as you see it in the above image. Alternatively you can get the letters and numbers right off the disc and case side.
BOOT.ELF
-- In the uLaunchELF folder there's a file called BOOT.ELF, it is the only file you need from the download.
Create Exploit Save
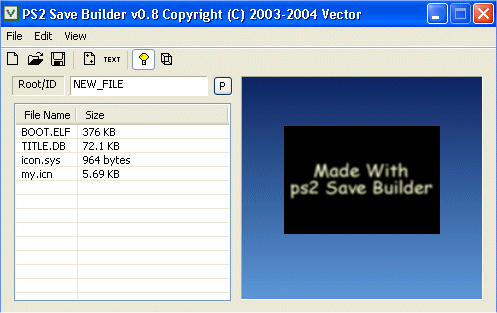
-- Now run ps2save-builder.exe. Press the New File button so that an icon.sys and my.icn entry appear in the list. If you do not do this you will see Corrupted Data messages when using AR and it wont work. ............So do it!
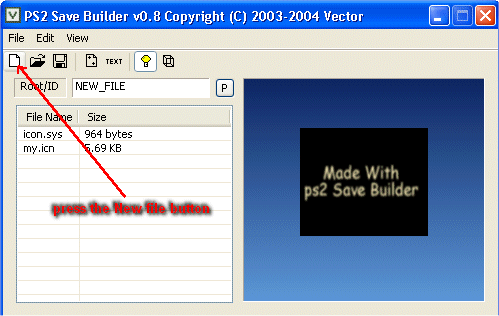
-- Drag the TITLE.DB file from the folder into the list in PS2 Save Builder. Also drag the BOOT.ELF file from uLaunchElf in to the same list. The list should look like the below image.
Note upper casing and exact naming IS important. File size is not so important, these will change depending on released versions of software.
Note : Some versions will not accept the folder name of " NEW_FILE ", so change it to your region by naming it accordingly:
BADATA-SYSTEM - for NTSC - U/C
BEDATA-SYSTEM - for PAL
BIDATA-SYSTEM - for NTSC - J
I will still refer to this in the rest of the guide as NEW_FILE, so you will know its the same one im refering to.
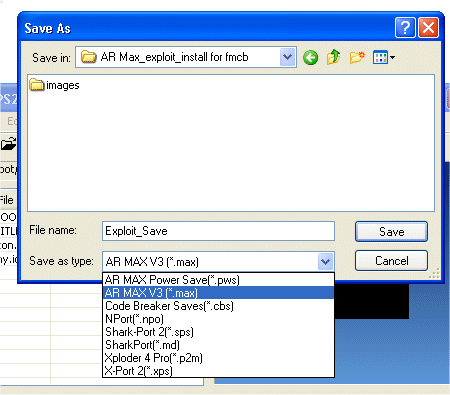
-- Click File > Save As in PS2 Save Builder. Choose AR MAX V3 (*.max) from the Save As Type field, and type "Exploit_Save" as the name (shouldn't matter what name you use, but it works for me).
-- Now transfer this file to the root of your USB drive (eg: I:\Exploit_Save.max).
Right-click the Exploit_Save.max and "send to" your USB device in the list that appears.
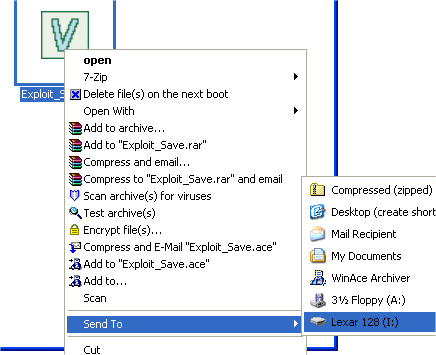
NOTE: You can also "send" the INSTALL folder and the FREE_MCBOOT.ELF to your USB device now , as we will be using it later in the tutorial.
Transfer exploit to mem card.
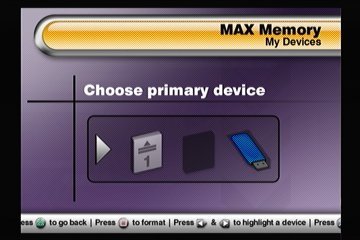
-- Stick USB stick and Mem Card in to the PS2. Load AR disc.
-- Once AR loads, open Max Memory section, then My Devices, then select your Mem Card (1 or 2).
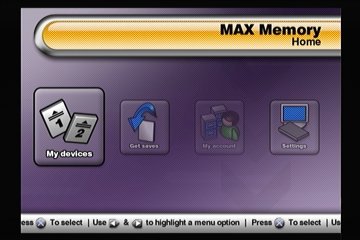
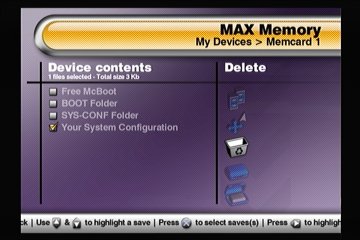
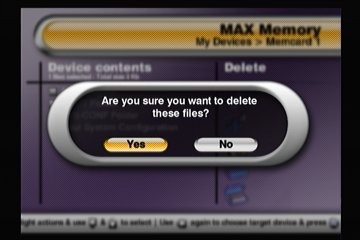
-- Highlight the Your System Configuration entry and press X to select it, then move right and down to select delete and confirm it.
-- Now hit triangle to move back a screen, select the USB stick, and if you remembered to add my.icn and icon.sys you should see an entry called NEW_FILE and not Corrupted Data. Depending on how much other stuff you have on your USB stick it could take a few minutes to show anything in the list so just wait for it.
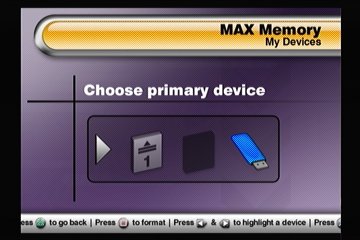
-- Highlight and hit X to select NEW_FILE, move right and down to Uncrush and right to select your memory card (1 or 2). Hit X and confirm.
-- You will see the file now writing to the MC
-- Now navigate back a screen, select your mem card again and check to see that NEW_FILE is listed. If so, you can remove the AR disc and USB stick.
Run Exploit.
-- Insert your PS1 game, reboot if necessary, and once the game starts loading you should see a quick white flash and then see the ULaunchElf screen.
IMPORTANT: If you did not copy your INSTALL folder and FREE_MCBOOT.ELF to USB devuce, you must do it now before continuing!
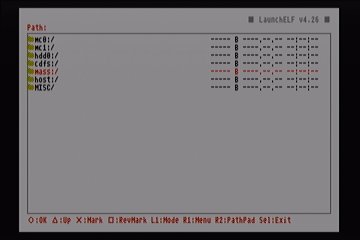
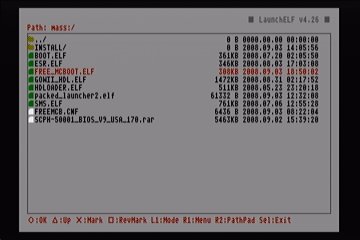
-- Ensure the USB stick is connected. Press O button for the FileBrowser in the uLaunchElf screen, move down to mass:/ and hit O, then move down to select FREE_MCBOOT.ELF and hit O to run it.
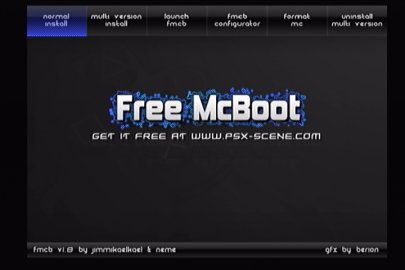
Next the installer should load.....


 Views : 1302
 Comments : 0
 Rating :
  Last Updated : May 22, 2010


