A Beginner's Guide to Solving a Rubik's Cube


Shorthand Abbreviations
In order to tell you how to manipulate your cube, some language needs to be established in order to guide you in the right direction.
- F = Front
- B = Back
- L = Left
- R = Right
- U = Up
- D = Down
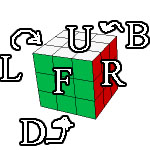
When you see these letters in a series, it means you're going to rotate that face of the cube clockwise, as if you were looking at that face. The times this is most often confused is when using the L face and D face. It takes some getting used to in order to visualize which way is clockwise, but it gets easy with practice. The only other shorthand you will see me use is the small letter "I". This indicates counterclockwise spinning of the face. The same rule applies as before, it's counterclockwise as if you were looking at that face. The shorthand looks like Fi, Bi, Li, Ri, Ui, and Di. Also note that "2" can be placed in front of any of these to indicate that you do it "twice" or 180 degrees. Also, now would be a good time to mention that these indicate the front/back/sides/etc depending on how you're holding it at the time. The "front" face doesn't always have to be a certain color. It's all relative to how you're holding it for that particular move.
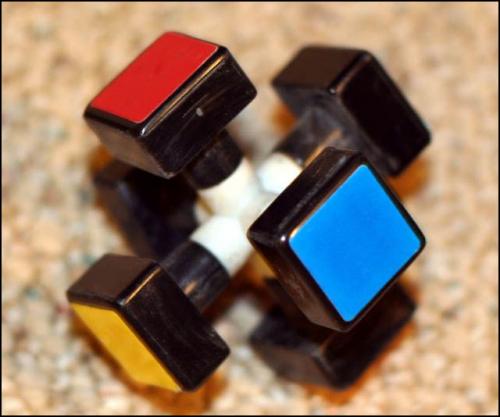
Before we move into some of the beginner's algorithms used, there is one main concept I want to show you. The "middle" pieces, or the pieces that never touch an edge, are permanently in place. They will never change position in relation to each other. This is absolutely the most important thing to keep in mind. That means that we will be moving the edge and corner piece around the middle pieces because the middle pieces will never actually move. To demonstrate this, there is a picture of a Rubik's cube disassembled. In addition to the middle pieces, there are two other types: edge, and corner pieces. Edge pieces have 2 colored stickers on them, and corner pieces have 3. Note that no matter how much you move these around, if an edge piece has a blue and orange sticker on it, it will always be the blue and orange edge piece. That means each of the 26 pieces only has one correct place, so solving "one side" is pointless unless you have the edge pieces in the correct place. More on this later.
So now onto algorithms. The 3x3 Rubik's cube can be solved in 7 simple steps, every time. You can learn to follow these algorithms in a day, and memorize them with a 2nd day's worth of practice. What I'm teaching you is the easiest way to remember, not the fastest. There are a few additional algorithms that can help get your time below 2 minutes with minimal effort. I may add these at a later date, but for now I'm just supplying you with the easiest to follow and understand.
Step 1 - The Cross
Remember how I said the middle pieces never move in relation to each other, and edge pieces only have on correct place? Here's where you can start applying that knowledge. The ultimate goal of this first step is to create a cross (in this case, the white side) with the edge pieces having the matching color of the adjacent side's center piece. There really aren't any algorithms that can be used to simply solve this step, so it's mostly intuitive. I will, however, provide one algorithm that should at least help you. Here is the ultimate goal of the first step:
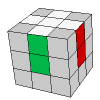
Figure 3
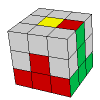
Now let's say you end up with something like this following picture. You have two edge pieces in the right plane, but they need to be swapped. The easiest way to move these edge pieces is to rotate them into the bottom plane, twist the bottom, and rotate them back into the top plane. The algorithm in this case is: 2R, Di, 2F [which will put the green/white piece into place] D, 2R [puts the red/white piece in correct position.] This is just one example, but just remember to get the white edge piece into the bottom plate, rotate the bottom place until it's below where it needs to go, then rotate it up to where it needs to be. It's mostly intuitive, but this should help.
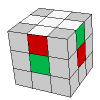
Figure 4
Step 2 - Top Corners
Once you have your cube looking like Figure 3 it's time to solve the white corners. There are 4 corner pieces with a white sticker on them, and 2 other colors. First find a white corner piece in the bottom layer and line it up between the two sides it's supposed to be between [i.e. If it's a white/blue/orange piece, rotate the bottom layer until it's between the blue and orange sides.] and this algorithm will flip that piece up into the spot in the top layer directly above it. For example you start with the first one (orange on the underside of the white corner piece) and want to flip it up.
 →
→
The algorithm used here is: Ri, Di, R, D (x1, x3, x5) Note that you may have to do this algorithm several times depending on the orientation of the white face on the bottom corner block. If it's facing down, you'll have to do it three times, or if it's facing the opposite direction then you will have to repeat it five times. It may be tedious but once you learn how to move the pieces around there is an easy shortcut to learn. This is fine for now. Repeat on all 4 corners. You may have a white corner "stuck" in the top layer already but in the wrong position or in the wrong orientation. Just rotate the cub and perform this algorithm once to get it into the bottom layer and then shift the bottom layer until it's below where it needs to be, then repeat the algorithm until it's in the right orientation. Easy enough? I hope so. Here's how your cube should look.
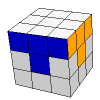
Figure 7
Step 3 - Middle Edges
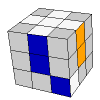
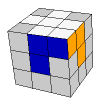
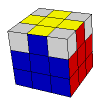
At this point in time it's best to flip your cube 180 degrees so white is now on bottom and yellow is now on top. Remember, the F/B/U/D/L/R indicates the face you're manipulation depending on how you're holding the cube, they don't correlate to any specific color. Now we'll be solving the middle edges. This is an exciting step because your cube will start to resemble the finished solution. The first thing you'll want to do is get one of the edge pieces lined up with the middle piece below it, similar to how you solved the cross in step 1. There are two ways they can be lined up (remember each piece only has 1 place it's supposed to go.) They are shown in the two figures below:
 &
& 
Figures 8 and 9: Note these are not the same configuration
In both cases, the red will be considered the front face.
Case 1 (Figure 8): U,R, Ui, Ri, Ui, Fi, U, F.
Case 2 (Figure 9): Ui, Fi, U, F, U, R, Ui, Ri.
Repeat this for each corner piece. If you have a middle edge piece stuck in the wrong place you can use this algorithm once to get it out, move it to the correct place, then repeat it to put it in it's correct place. Here is the result after you finish this step.
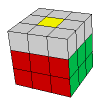
Figure 10
Step 4 - The Top Cross
This will be similar to step 1, but we won't worry about lining up the correct edge pieces just yet, we'll do that in the next step because it's easiest to keep these parts separate. As of now your top layer should resemble one of the following.
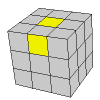 OR
OR 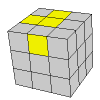 OR
OR 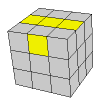
Figures 11, 12, and 13. Note there can be other yellow squares present.
These are the only three possible configurations unless your cross is already solved, in which case you're extremely lucky. Regardless, whichever one you're on determines how many times you repeat the following algorithm. Figure 11 you'll repeat it the most times (about 3) and figure 13 you'll only need to do it once. Note that if you start at Figure 11, you may have to reorientate your cube to make it look like one of the above figures. So here's the algorithm: F, R, U, Ri, Ui, Fi. Repeat as necessary. The following figure is an example of what your cube might look like. The only important part is the yellow cross on top, also note that the edge and corner pieces aren't matched yet. That is coming up next.
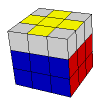
Figure 14
Step 5 - Matching the Edge Pieces of the Cross
This part should be fairly easy. All we're doing is matching up the yellow/anycolor edges up with the color of the center piece below, similar to how we did the first white cross (Figure 3). Until you learn some of the shortcuts, you'll just have to keep repeating the algorithm until you get everything lined up. It shouldn't take more than 3-4 times. First, line up at least one of the edge pieces with where it's supposed to go, as illustrated.
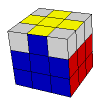
Figure 15
With the blue face as your "Front" face, perform the following algorithm several times until every edge piece matches up similar to your first white cross. Use this algorithm: R, U, Ri, U, R, 2U, Ri. Repeat until all edge pieces match up with the center pieces below them. The final result is pictured below:
Step 6 - Rotating the Corners
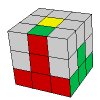
In this step we're just rotating the corner pieces around so they're at least in the correct position - we'll change the orientation in step 7 and we'll be done! I've found the easiest way to do this is make sure the corner piece in the "top right" position is in the correct place and use the algorithm from there, this ensures the fastest route possible is taken (using this algorithm, anyway.) If all pieces are in incorrect spots just start on any side, it doesn't matter. Here's an example of a good place to start, using red as your "front" face, of course.
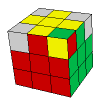
Figure 17
The algorithm used to switch the corner pieces is: U, R, Ui, Li, U, Ri, Ui, L. Remember the corner pieces just have to be in the correct position, not the correct orientation. If after the corner pieces are in their correct position, there is a slight chance that they will already be correctly oriented. If that's the case, you're lucky. If not, continue to step 7!
Step 7 - Orientating the Last Corner Pieces
This last step is a little finicky and can take some patience/creativity to solve. To keep things simple I'm just going to teach one last algorithm, although there are at least 4 you can use to solve it faster depending on how your cube is set up at this point. I'll show you a couple different scenarios and you should be able to decide how to proceed from there. First of all I'll show you what exactly this algorithm does to help you figure it out with a little bit of intuitiveness (yes, that's a word.) Here is the algorithm used in this step (I know, it's very long, but bear with me!): L, U, Li, U, L, 2U, Li, Ri, Ui, R, Ui, Ri, 2U, R
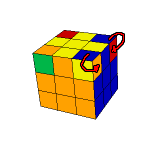
Figure 18: The best way I can describe what happens is the two corner pieces on the right face turn the upper-face of the corner "in-wards."
- Scenario 1: There are two same-colored cubes adjacent to each other. You can solve at least these two corner pieces in one move without messing anything else up. Just use the algorithm once, easy as pie.
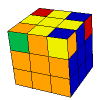
Figure 19
- Scenario 2: There are two opposite-colored cubes adjacent to each other. Same deal as scenario 1 but you'll need to perform it twice (once to get them to the same color, once again to orient them correctly.)
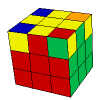
Figure 20
- Scenario 3: One corner piece is solved, but there are 3 that are unsolved. In this case you'll have to use your best judgment using your knowledge. If two corners have adjacent colors facing up, set up those two on the right face and use the algorithm in that orientation first. If not, it's super important to orient one of the outside corners first. If you solve the corner connecting the other two you will have two non-contiguous unsolved corners, which will just take you longer to solve.
- Scenario 4: Two unsolved corners at opposite corners of the cube. This is the biggest pain in the butt. See if you can solve one of the cubes by picturing how it will be oriented after you use the algorithm (refer to figure 18.) This will most likely take 3 tries until it's solved. So after you finish this step you should be done!
This is the first version if this tutorial. There are likely typos which aren't a huge deal, but if you keep trying and trying and this guide isn't helping you solve your Rubik's cube, there may be a typo in one of the algorithms. If this is the case, please don't hesitate to e-mail and I'll see if I can fix it. dougwelch@gmail.com


 Views : 28995
 Comments : 136
 Rating :
  Last Updated : Aug 10, 2007


