How to create a free website


Hello. This has taken me ages to get on the web so you better be happy! In this tutorial you will learn how to create a basic free website and then upload it onto the web for the world to view, with is own domain name. I have to say it took me two weeks to find out how to build a website. There are no guides telling you how to upload one. After a while of trial and error and finding some snippets of information, I put together this tutorial on how to make a website. Enjoy! 
Things you will need
Before we start there are a few things you will need, they are listed below.
Internet Connection - Preferably broadband as it is quicker and you can upload more
FileZilla - FileZilla allows you to upload files to your website. It can be downloaded here at: http://filezilla-project.org/download.php?type=client and choose whatever platform you're using.
FrontPage/ Dreamweaver / Web designer - I highly recommend that you buy Macromedia Dreamweaver as I think it's the best web designer program. This will build your website if you don't have any of these just save a notepad document as .html, the only problem with that is you have to write in html code.
Let's Begin
1.Free Domain and Hosting
First go to - http://hyperphp.com/component/option,com_wrapper/Itemid,8/ . This is the place where you will get your free domain and hosting.
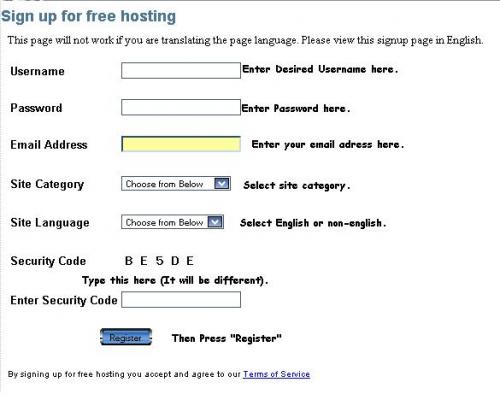
Fill out all your details and click register.
Simply fill out the image verification and click register again.
Another page will appear, with your details on it. I suggest you save a copy as it has important information that we will use later. After you've saved it click "Click here to log into your VistaPanel". This is the panel where you will make your domain name. Bookmark this - http://cpanel.hyperphp.com/index.php as this will be where you log in next time. First you will need a domain name. Still on the control panel page, under the title "Domains", with a picture of the world next to it, select "Sub Domains". 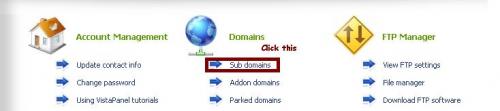
Where it says "
It should say your domain name under "Current Sub Domains". You can make up to six of these domains but for now just make one.
2.Creating the website
There are a few sites that tell you how to create a site. I am currently writing one, but for now I shall just assume you know how to create a webpage. First create the homepage and save it as index.html this is very, very important! Save it in a folder all to itself and place all the necessary files for that page in that folder to.
3.Uploading using FileZilla
Start up FileZilla. As I have already stated FileZilla allows you to upload files to your website. The top of the page should look like this: 
Enter these details:
Host: ftp.hyperphp.com
Username: This is your hyperphp username and should be along the lines of hp_0000001. To find it look in the file where you saved a copy of the information and it will be next to "FTP user name".
Password: Is the same as your hyperphp password.
Port: 21
Then press the Quick connect button.
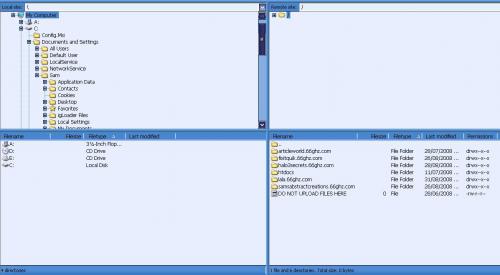
It should look like this above.
In the bottom left box are your files and in the bottom right are your website files. We will refer to them as left and right. Find the folder in the left box with your website in and index.html, open it and select all the files using shift. In the right box click your domain name then htdocs. Once done right click the selected files and select upload. You should see its progress at the bottom of the screen. Once it has successfully transferred all the files.
4.View your website
Go on an internet browser and type the URL of your site e.g. http://www.yourdomain.66ghz.com.
5.All done
Hey presto your site should be there, if not re-read above and if it still does not work comment any problems. Cheers.
Hope this helped.


 Views : 1882
 Comments : 0
 Rating :
  Last Updated : Feb 7, 2009


