How To: Password Protect Files on a Mac
So a lot of people wonder how they can password protect some of their files so no one else has access to them. This tutorial will you show you how to do just that.
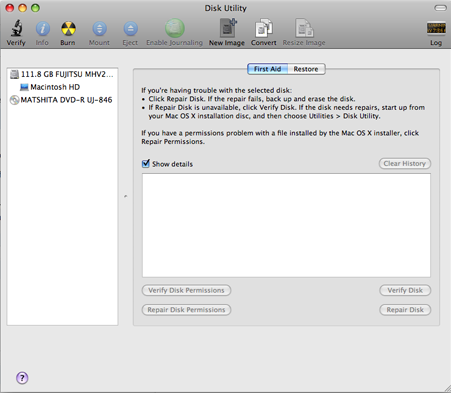
The first step would me to open the Disk Utility (Applications -> Utilities -> Disk Utility)
Once the Disk Utility is up, click on the “New Image” button on the top part of the window.

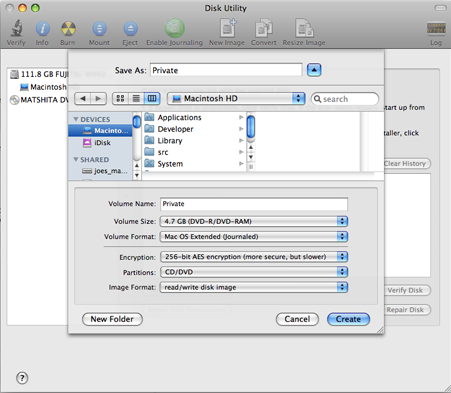
A drop down will show up asking for some information. Name the Disk Image what ever you would like, and choose a location where you’d like to save it.
Enter a volume name in the text field for what you’d like the volume to be named when it is mounted to the desktop.
Choose a volume size from the drop down for a size you’d like to password protect. I chose the 4.7 gb preset because that way, I can burn it to a DVD if I needed. Format it as Mac OS Extended (Journaled).
The next step will include the actual password protection:
Click on the drop down menu for Encryption and choose which level of security you’d like to have for your files. You can choose either 128 bit AES encryption, or 256 bit encryption. If you’d like more security, go with 256, however if you’d like it to be a bit faster, then choose the 128.
Don’t worry about anything for the Partitions or Image format options. You can keep them the default.
Next, click the “Create” button, then you’re done! It will take a little bit of time to create that disk image for you, then you’ll be able to access it with the correct password.

When opening the disk image, remember not to check the “Save password in keychain” because otherwise, there’s really no point in having it password protected! If you have any questions, please leave a comment. Or even if you have some other options. Thanks for checking it out.


