Self watering recycled plant pot for growing herbs & flowers


Introduction:
Using this design and materials, plants can be grown for virtually the cost of a pinch of seeds. The planter waters itself via a cotton wick and reduces routine maintenance for the indoor gardener. Plus, the materials are cheap and readily available - and the best part - it's all recycled!
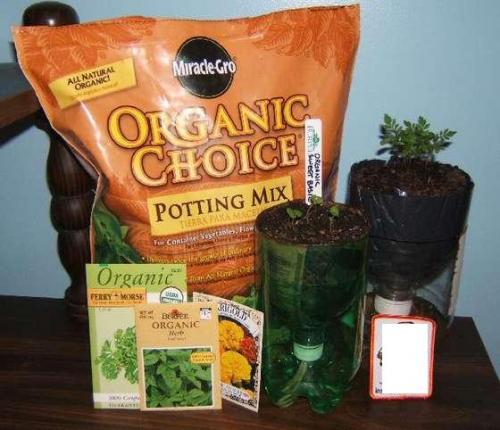
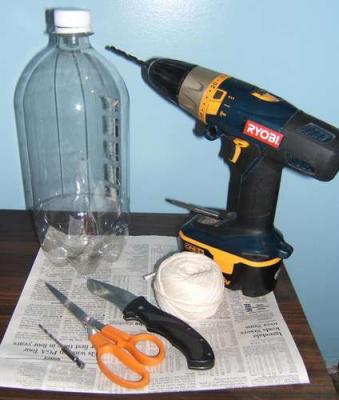
Step 1: Materials
You will need to gather these materials:
* One 2 or 3 liter soda bottle with the cap
* A piece of newspaper, a piece of plastic from a bag or a piece of aluminum foil
* Cotton string
* scissors or knife to cut the bottle
* a drill (or something similar) for making holes in the cap
* tape (optional)
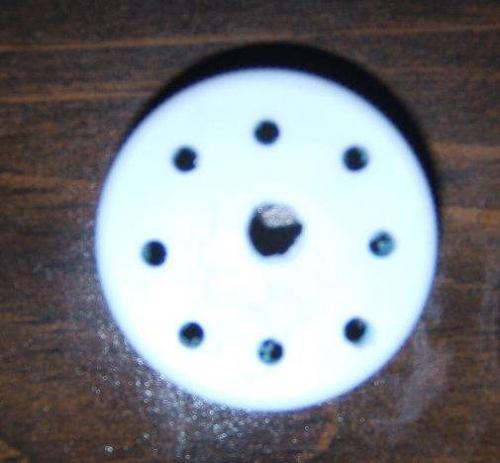
Step 2: The cap
To begin, I made holes in the cap for drainage and to accept the cotton string that will act as a wick to draw the water up into the soil.
I drilled one large hole in the center of the cap and eight smaller holes around it. The large hole is what will hold the string and the smaller holes will allow water to drain out.
Step 3: The wick
I am using cotton string to act as a wick to draw water up into the soil. As the soil dries and the roots absorb moisture, the wick will bring water back up into the soil from the reservoir below and feed the plants.
I cut three equal lengths of string (about 15 inches long) and tied them together with a simple knot about 3 inches up from the bottom.
Into the cap, I fed the three short lengths of string through the big hole in the middle of the bottle cap and pulled them through so the knot rests on the hole on the inside of the cap. The short ends will dangle in the water and the long ends will go up into the soil to feed the roots.

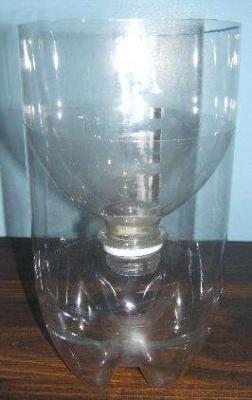
Step 4: Cutting the bottle
I used a marker to draw a line on the soda bottle to use as a guide when I cut it with scissors. The two parts that I was left with would be the cup and the reservoir.
When the cup is inverted (with the neck down) and put inside the bottle, it should not touch the bottom. There should be about 2 inches of clearance so that the wick can dangle in the water but the cap cannot touch it.
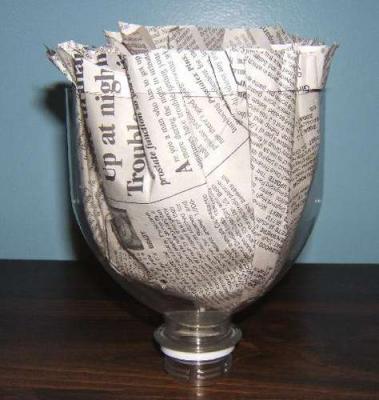
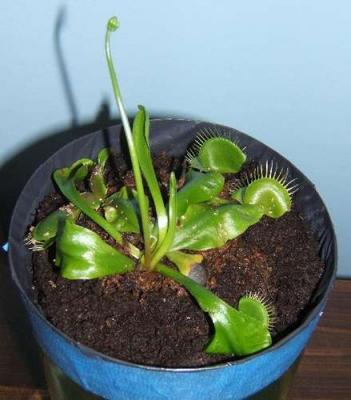
Step 5: The cup
The cup is what the soil goes into and where the plants grow.
Roots do better in darkness than in light, so they need to be blocked from sunlight.
To do this, I have tried three different materials. I have used a piece of black plastic from a garbage bag, aluminum foil and newspaper. I have found that newspaper seems to work best since it is biodegradable and helps to retain moisture. It is also easy to remove from the cup for transplanting. Best of all, it's the cheapest of the three since used newspaper can easily be obtained for no cost at all.
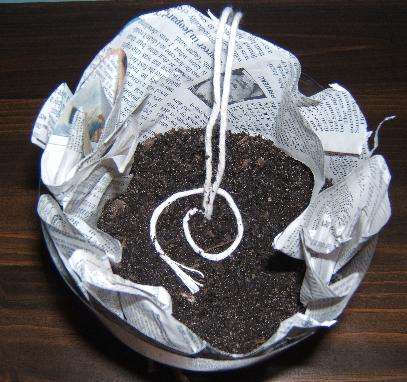
I put the light-blocking material all the way into the cup, trying to flatten it against the sides of the cup to increase the amount of soil that I can fit in later. Once it was in there nicely, I poked a hole in the bottom for the wick.
Step 6: The cup cont'd
I fed the wick through the hole that I poked in the cup and screwed the cap on.
The cup is now ready for soil.
Step 7: Soil
Depending on each particular plant's moisture needs, I mixed up the appropriate soil with perlite, vermiculite or peat moss and was ready to add it to the cup.
I held the wick up into the middle of the cup and began putting the soil in. Having the wick run up in the middle of the soil helps it to absorb water more quickly and allows the roots to get to it much faster than if the three strands were separated and on the sides.
After adding a little bit of soil, I separated one string and made a coil in the dirt. I put a little more soil in and made a second coil. I put in a little more and made the third coil and then filled it up the rest of the way. I believe that the coils help to spread out the moisture better than just having them going all the way up the middle.
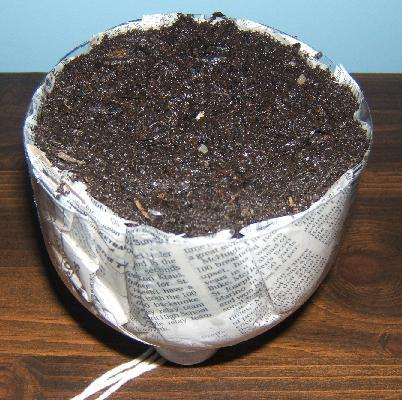
Step 8: Water
After all the soil was in the cup, I trimmed off the rest of the newspaper and thoroughly soaked the soil with water. Depending on the plants needs, you may not be able to use regular tap water, and since I have a rainwater collector that is what I use the most.
So, I soaked the soil thoroughly and let it drain for an hour. I also made sure that the bottom part of the wick was wet as well, since this will help it absorb better. Placing a dry wick into the reservoir will cause it to float and not absorb as well.
Take care to let the cup drain completely. Drips of dirty water into the clean reservoir water can cause algae to grow. The water should only need to go up, not back down into the clean water.
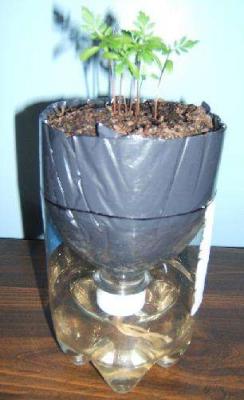
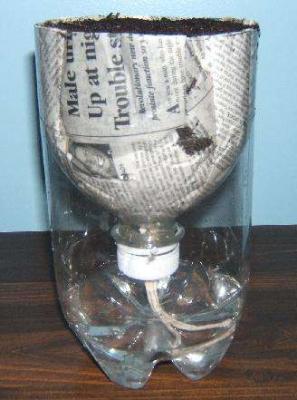
Step 9: The reservoir
The reservoir is just the bottom of the bottle and is used to store water.
I put some water into it and placed the cup inside. There should be enough water for the wick to dangle into, but not so much that it touches the cap. I have found that too much water will encourage algae to grow since little pieces of dirt that fall through the hole in the newspaper contaminate the clean water. This isn't beneficial, because this design is meant to constantly feed the plant clean water and algae will make it harder for water to reach the soil.
Since the cup pressed down into the reservoir creates a vacuum, it makes the removal of the cup a little tough. To solve this, I put a tiny hole on the side of the reservoir to let air in. Now the cup can be removed easily for watering, transplanting or harvesting.
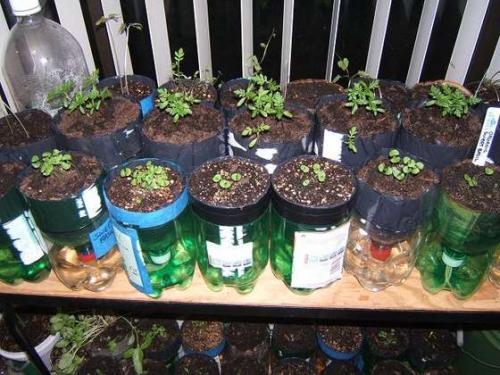
Step 10: Planting the seeds
Now that the planter is finished, it is time to plant seeds. The planter is useful for growing small plants such as herbs and flowers or as a starter for larger plants that will have to be transplanted later. Make sure to provide the plants with the proper amount of sunlight that they need to grow.
The wick delivers clean water from the reservoir up into the soil and to the roots. This is quite useful, since the plants can be left unattended for periods of time because the soil waters itself. Basically, they can be left alone to grow with little care from the gardener. Using a two liter bottle, two inches of water keeps the soil moist for nearly two weeks or more. I have been pleasantly surprised with how well this works.
About once every few weeks, I remove the cup, water the soil, rinse off the wick and allow it to drain. This helps to wash out any buildup of minerals in the soil and completely rehydrates everything. Take care to let it drain completely so as not to contaminate the new fresh water in the reservoir.
Then, the cup goes back into the reservoir and I can walk away from it for another couple of weeks.
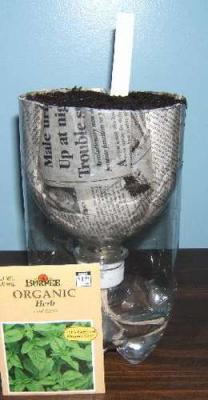
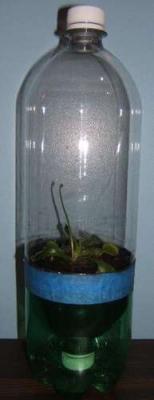
Step 11: Optional step: Creating a mini-greenhouse lid
This step is optional, but the planter can be made into a mini greenhouse or terrarium with another bottle. This is useful for plants that require a high humidity to grow.
I used another soda bottle and cut the bottom off. The place where I made my cut is right below where it begins to curve. Cutting it above this will prevent the new greenhouse lid from fitting in easily and snug. So, look at the bottle, observe where it begins to curve and cut a little below it.
The greenhouse lid will now fit into the cup easily and will trap the humidity. It will not be uncommon to see water beading up on the sides and dripping down into the soil. I have not had any problems with the water leaking back down through the soil and into the reservoir. I think that is because the wick will only absorb as much water as the soil needs to fill the deficit of water created by the absorption from the roots.
Summary:
These planters are easy to make and are made with recycled products that would normally be discarded. They can be decorated and given as gifts, made by children as projects or just left on a windowsill to grow fresh herbs or flowers.
The soil really does seem to stay moist longer than it does in a conventional flowerpot with regular watering. My favorite part is that the plants will grow with very little help or attention from me.
The fact that all the parts used (the bottle, the newspaper, the compost, rainwater) are all recycled or free and can be recycled again is what I like a lot. The planter can be used several times and can simply be tossed into a plastic recycling bin when finished.
I've made dozens of these and what I like the best is that I can grow miniature crops of herbs and flowers for literally the cost of the seeds and with little effort on my part.
Have fun and happy gardening!


 Views : 17184
 Comments : 35
 Rating :
  Last Updated : Mar 23, 2008


